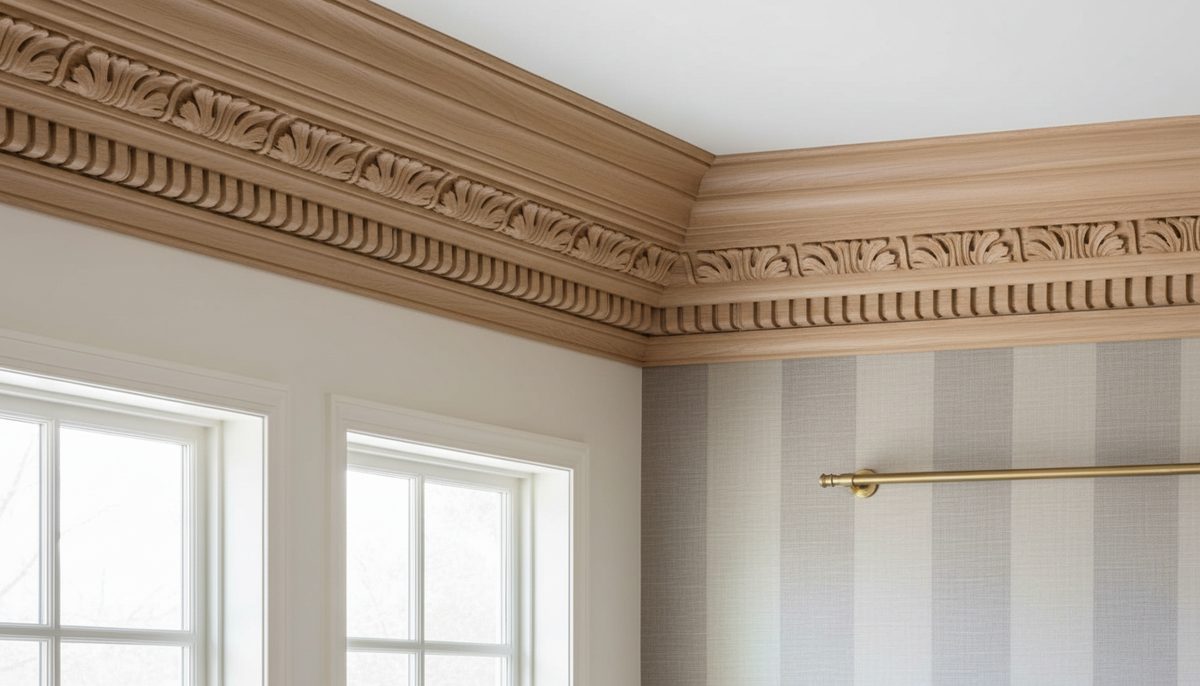
The most common trim mistake in US houses is crown molding that is too small for the room. A 2.5-inch profile on a 9-foot ceiling looks like a mistake in scale, and it costs almost the same in labor as the size that would have looked right. Sizing comes first, before the profile, before the material, before anything.
Size it to the ceiling
The working rule is roughly half an inch of crown height for every foot of ceiling height, taken as the finished vertical face the molding covers on the wall.
- 8-foot ceilings. 3 to 4.5 inches of total molding width. Larger than that visually drops the ceiling in a small room, and it will collide with door casing head trim.
- 9-foot ceilings. 4.5 to 6 inches. This is the range most people underspend in.
- 10-foot and taller. 6 to 8 inches, and at that scale a built-up assembly usually reads better than a single piece.
Two adjustments to the rule. In a room with substantial baseboard, the crown should not be dramatically smaller than the base. A 7-inch baseboard under 3-inch crown looks bottom-heavy. And in a bedroom with a lot of soft furnishings and no other millwork, dial the size down; heavy crown in a room with hollow-core doors and no casing looks borrowed from a different house.
The other number is projection. Crown sits at an angle, so it covers a distance on the wall and a distance on the ceiling. A 5.25-inch molding at a 38-degree spring angle covers roughly 4.1 inches down the wall and 3.3 inches across the ceiling. Check both before ordering, because ceiling projection is what runs the molding into recessed light trims and cabinet tops.
Profiles and what they signal
The profile does more to set the character of a room than the size does.
Cove. A simple concave curve, no ornament. The quietest option, correct in a modern or transitional house and the least likely to fight anything.
Ogee and reverse ogee. An S-curve. The default residential crown, traditional without being fussy, and available in every material and size.
Dentil. A row of small rectangular blocks. Formal, colonial, and heavily dependent on the block spacing landing evenly at corners. Skip it unless you are ready to plan the layout wall by wall.
Egg and dart, acanthus, and other cast ornament. These belong in rooms with matching casing, tall ceilings, and usually a fireplace surround to answer them. In a builder-grade room they look pasted on.
Stepped modern. A square-edged, flat-faced build-up with no curves. This is the one that works in a contemporary house where a traditional profile would be out of place, and it can be assembled from plain flat stock.
Build-ups are how you get a large, custom-looking cornice without paying for a large single profile. A cove crown, a flat filler board on the wall below it, and a small cap on the ceiling reads as one 8-inch cornice and costs less than an 8-inch molding, but adds a second and third set of joints to cut.
Materials, honestly compared
Primed MDF is the most common painted crown. It is dimensionally stable indoors, has no grain to raise, and takes paint flat. It is heavy, it does not like moisture, and it splits at the tip if you nail too close to a thin edge. Long lengths sag when you carry them, so support the middle.
Finger-jointed primed pine is lighter, holds a nail better, and shrugs off humidity swings. Finger joints occasionally telegraph through paint after a season, and knots in cheaper stock bleed unless you seal them with a stain-blocking primer.
Polyurethane and high-density polymer crown is the practical answer for large ornate profiles and for bathrooms. It is light enough to install alone, it will not rot, and it comes with matching corner blocks. It expands and contracts more than wood with temperature, so joints need to be glued with the manufacturer’s adhesive rather than just nailed, and it dents if you hit it.
Solid poplar or maple is for stained crown. Stained crown is a commitment: every joint shows, coping has to be perfect, and there is no caulk to bail you out.
Plaster cornice is the real thing in older homes. It is heavy, expensive, installed in sections with plaster adhesive, and repaired rather than replaced. If your house already has it, patch it instead of ripping it out.
Spring angle and cutting
Crown does not sit flat against either surface. The spring angle is the angle between the back of the molding and the wall, and it is almost always 38 or 45 degrees. You have to know which one you have before you cut anything, because miter and bevel settings differ. Set the molding into the corner of a framing square and read where it touches.
Two methods work. Cutting nested, with the molding upside down against the saw fence at its spring angle, means you set the miter to 45 degrees and cut, and the geometry takes care of itself. Cutting flat on the table requires compound settings: for a 38-degree spring on a 90-degree corner, that is roughly 31.6 degrees miter and 33.9 degrees bevel. The flat method handles wide molding that will not fit nested, but every setting has to be dialed in and tested on scrap.
Inside corners should be coped, not mitered. Cut the first piece square into the corner. On the second piece, cut an inside miter, then follow the profile line the miter reveals with a coping saw, back-cutting slightly, so the end matches the face of the first piece. A coped joint stays tight when the house moves. A mitered inside corner opens in the first heating season.
Outside corners are mitered, glued at the joint, and pinned through both faces. Check the actual corner angle with a bevel gauge before cutting. Drywall outside corners are rarely 90 degrees; 91 or 92 is normal, and cutting to 45 leaves a visible gap at the tip.
Installing, and the walls that fight you
Snap a line on the wall at the bottom edge of the crown. Locating that line off the ceiling means the crown follows every dip in the ceiling. Locating it off the floor means it fights the ceiling. Split it: mark level, then check the gap at the ceiling along the run, and if the ceiling drops more than about 3/8 inch, follow the ceiling and let the bottom edge float, because a shadow gap at the top is far more visible than an out-of-level bottom edge.
Install nailing blocks in the corner void for wide crown. Without backing, you are nailing into the top plate through the ceiling angle and the molding flexes between studs.
Start on the wall opposite the door with both ends square, then cope into it from both directions. Save the wall with two coped ends for last.
Fill nail holes twice, caulk the top and bottom edges in a single continuous bead per run, and paint in satin or semi-gloss. Match the sheen to your other trim, not to the ceiling.
Rooms where crown is the wrong call
Ceilings under 8 feet with an existing 6-inch baseboard. Adding crown compresses the wall from both ends.
Rooms with a vaulted or tray ceiling that already has a defined edge. The transition angles are difficult and the ceiling is already doing the work.
Kitchens with upper cabinets running to within a few inches of the ceiling. Crown on the cabinets and crown on the wall in the same sightline is one line too many. Pick the cabinets.
Any room where the drywall corners are wavy and the budget does not cover fixing them. Crown magnifies a bad ceiling line rather than hiding it.