Transforming a room from ordinary to extraordinary often hinges on a single, impactful design element. A wall paper mural is a large-format image or design printed onto wallpaper material, designed to cover an entire wall or a significant portion of it, creating a singular, immersive visual statement that transcends the repetitive patterns of traditional wallpaper. These expansive artworks offer an unparalleled opportunity to infuse personality, depth, and a distinctive narrative into any interior, acting as a powerful focal point that can redefine the aesthetic and emotional resonance of a space. From breathtaking landscapes that transport you to distant locales to abstract compositions that spark contemplation, wall paper murals are not merely decorative coverings; they are curated experiences, meticulously crafted to elevate your home’s design. Starhouse recognizes this transformative power, curating selections that empower homeowners across the U.S. to achieve sophisticated, personalized interiors with confidence and precision.
Key takeaways
- Wall paper murals are large-format images designed to cover an entire wall, creating a singular, immersive visual statement distinct from repetitive wallpaper patterns.
- Choosing the right wall paper mural requires careful consideration of material type (e.g., non-woven, vinyl), installation method (e.g., paste-the-wall, peel-and-stick), and design aesthetic to match your room’s function and existing décor.
- Accurate measurement of your wall dimensions, including accounting for doors, windows, and a necessary buffer, is critical for seamless installation and avoiding material shortages.
- Modern wall paper murals offer diverse styles, from biophilic designs and abstract geometrics to vintage revivals, allowing for highly personalized interior expressions.
- Proper care, dictated by the mural’s material, ensures longevity and preserves the visual integrity of your investment, protecting it from environmental factors like direct sunlight and humidity.
- Strategic styling and pairing with complementary furnishings, textiles, and lighting are essential to integrate the mural into a cohesive and balanced room design.
Understanding Wall Paper Murals: A Definitive Overview
A wall paper mural is a large-scale, continuous image or design printed on a series of panels that, when installed together, create a single, cohesive picture across an entire wall or a substantial portion of it. Unlike traditional wallpaper, which features repeating patterns, a wall paper mural offers a unique, expansive visual narrative, transforming a flat surface into an immersive scene or artistic statement. This distinction is crucial for achieving a truly bespoke and impactful interior design.
The primary function of a wall paper mural is to serve as a focal point, drawing the eye and establishing the mood or theme of a room. Its ability to depict vast landscapes, intricate art, or photorealistic scenes makes it a powerful tool for spatial illusion and personal expression. Homeowners leverage wall paper murals to introduce elements that might otherwise be impossible or impractical, such as a panoramic view of a city skyline or a lush tropical forest, directly into their living spaces.
Key Differences: Wall Paper Mural vs. Traditional Wallpaper
While both wall paper murals and traditional wallpaper adorn walls, their fundamental characteristics and design impacts differ significantly. Understanding these distinctions is essential for making an informed choice for your home.
Traditional wallpaper is characterized by a repeating pattern that is designed to be seamlessly matched panel to panel, creating a continuous, often textural background. Its purpose is typically to add texture, color, or a subtle motif that complements the overall décor without dominating the space. Traditional wallpaper patterns are engineered to repeat horizontally and vertically, allowing for coverage of any wall size with minimal visual interruption of the pattern itself.
In contrast, a wall paper mural is a singular, non-repeating image or artwork. Each panel is a specific part of the larger picture, and they must be installed in a precise sequence to reveal the complete design. Murals are intended to be the star of the show, acting as a standalone piece of art that defines the aesthetic of the room. This makes them ideal for accent walls or for creating an immersive environment that transports the viewer.
Types of Wall Paper Murals by Installation Method
The installation method significantly influences the ease of application, permanence, and potential for removal. Starhouse offers a curated selection of murals designed for various preferences and skill levels.
-
Traditional Paste-the-Wall Murals: These murals typically consist of a non-woven or fabric-backed material that requires adhesive to be applied directly to the wall before hanging the panels. This method provides a strong, durable bond and allows for slight adjustments during installation, making it a preferred choice for professional installers and those seeking a long-term solution. The quality of the adhesive used plays a critical role in the mural’s longevity and adhesion.
- Durability: Highly durable and resistant to wear when properly installed.
- Permanence: Generally considered a more permanent installation, though modern pastes allow for easier removal than older methods.
- Adjustability: Allows for minor repositioning during installation, which is beneficial for precise pattern matching.
-
Peel-and-Stick Murals: Also known as self-adhesive or removable wall paper murals, these feature an adhesive backing protected by a release liner. Installation involves simply peeling off the liner and pressing the mural onto the wall. This type is highly popular for DIY enthusiasts, renters, or those who enjoy changing their décor frequently, as it is designed for easy removal without damaging the underlying wall surface. The adhesive is typically pressure-sensitive and reactivates with firm application.
- Ease of Installation: Most DIY-friendly option, requiring no external glues or special tools for adhesion.
- Removability: Designed for clean removal, making it ideal for temporary décor or rental properties.
- Flexibility: Allows for repositioning during initial installation, though repeated repositioning can diminish adhesive strength.
-
Pre-pasted Murals: These murals come with a dry adhesive coating on the back that is activated by water. The panels are typically soaked in water, then hung directly onto the wall. Pre-pasted murals offer a middle ground between traditional and peel-and-stick options, providing a simpler installation than traditional paste-the-wall while still offering good adhesion. However, the soaking process can be messier than peel-and-stick.
- Convenience: Eliminates the need for separate adhesive, simplifying the process.
- Adhesion: Provides a strong bond once activated and dried.
- Installation: Requires precise handling once wet, as panels become heavier and more pliable.
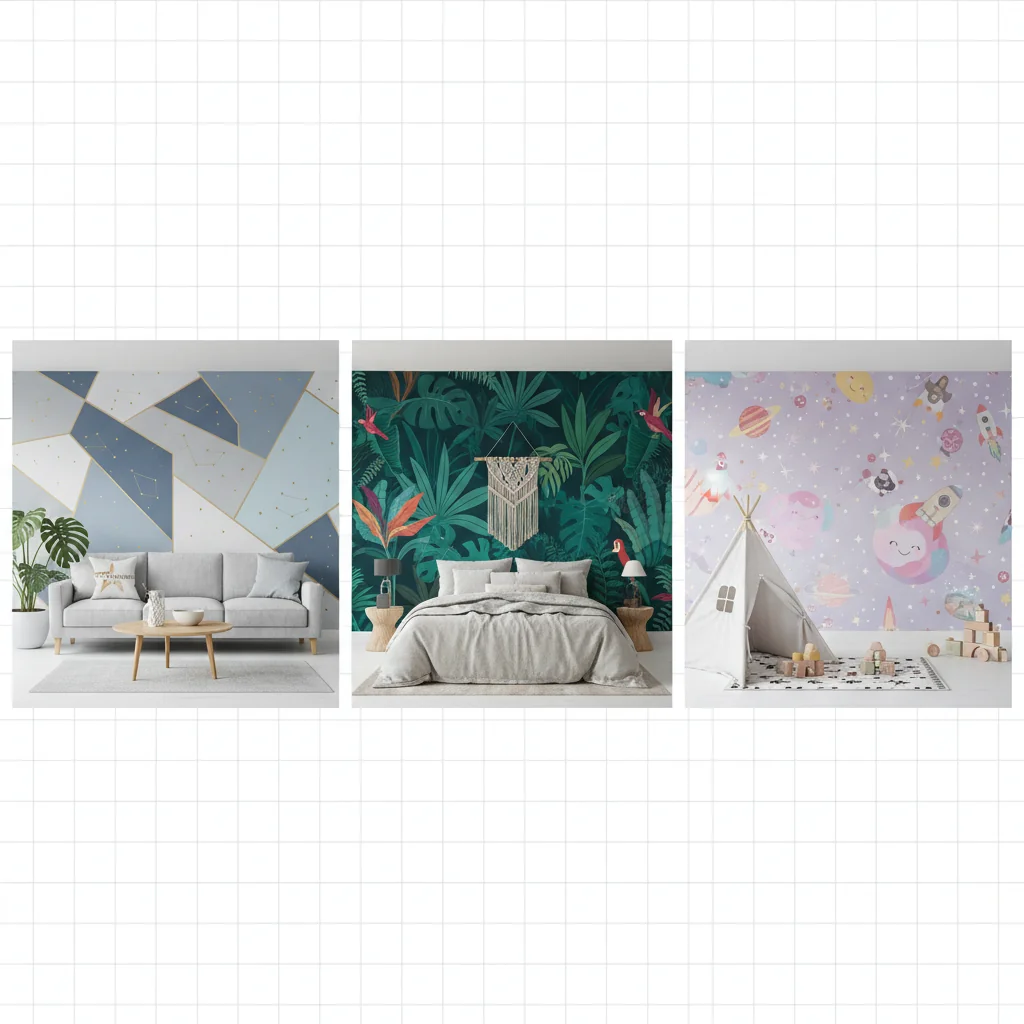
Exploring the Spectrum of Wall Paper Mural Styles and Themes
Wall paper murals offer an expansive palette of styles and themes, enabling homeowners to craft virtually any aesthetic or mood within their space. The selection of a particular style directly influences the room’s character, its perceived size, and the emotional response it evokes. Starhouse curates designs that span a vast range, ensuring there is a perfect mural to articulate every unique vision.
From serene natural vistas that instill calm to dynamic abstract compositions that ignite creativity, the stylistic versatility of wall paper murals is unparalleled. Each style category carries its own distinct visual language and impact, allowing for highly personalized interior statements that reflect individual tastes and functional requirements of a room.
Dominant Wall Paper Mural Style Categories:
-
Nature and Landscape Murals: These are among the most popular choices, bringing the tranquility and beauty of the outdoors inside. They encompass a wide array of scenes:
- Forests and Woodlands: Dense canopies, sun-dappled paths, and towering trees create a sense of depth and peacefulness, often in greens and browns.
- Mountains and Valleys: Majestic peaks, rolling hills, and expansive vistas introduce grandeur and a sense of adventure, often using cool blues, grays, and earthy tones.
- Coastal and Ocean Scenes: Serene beaches, crashing waves, and underwater worlds evoke calm, freedom, and a refreshing atmosphere, typically featuring blues, whites, and sandy hues.
- Botanical and Floral: Large-scale renderings of flowers, leaves, and intricate plant life can be vibrant or subdued, adding organic elegance and a touch of biophilic design.
- Wildlife: Depictions of animals in their natural habitats add character and a connection to the wild, suitable for various rooms, including children’s spaces.
These styles are particularly effective in living rooms, bedrooms, and home offices where a calming or inspiring backdrop is desired. They excel at creating an illusion of space and depth, making smaller rooms feel more expansive.
-
Abstract and Geometric Murals: For a modern, contemporary, or minimalist aesthetic, abstract and geometric murals are ideal. They focus on shapes, lines, colors, and textures rather than representational imagery.
- Abstract Expressionism: Bold brushstrokes, fluid forms, and vibrant color fields create dynamic, artistic statements.
- Minimalist Geometrics: Clean lines, simple shapes, and often monochromatic or limited color palettes offer sophistication and order.
- Art Deco and Mid-Century Modern: Iconic patterns, metallic accents, and stylized forms from these eras add vintage glamour and retro appeal.
These murals are often chosen for their ability to add visual interest and a contemporary edge without depicting a specific scene. They are versatile for various rooms, including living areas, dining rooms, and creative workspaces.
-
Cityscapes and Architecture Murals: These murals capture the energy and grandeur of urban environments or the intricate beauty of architectural marvels.
- Skyline Views: Iconic city skylines, especially at dawn or dusk, create a sophisticated, worldly atmosphere.
- Street Scenes: Bustling city streets, historic alleyways, or charming European cafes add character and a narrative feel.
- Architectural Details: Close-ups of intricate building facades, classical columns, or modern structures provide texture and a sense of scale.
Perfect for home offices, entertainment rooms, or urban-themed living spaces, these murals evoke a sense of connection to global culture and modern living.
-
Historical and Artistic Reproduction Murals: These bring classic art, historical maps, or vintage illustrations into the modern home.
- Old World Maps: Antique maps, often in sepia tones, add a sense of adventure, history, and intellectual curiosity.
- Renaissance and Classical Art: Recreations of masterpieces from art history introduce cultural sophistication and timeless beauty.
- Vintage Advertisements and Posters: Retro designs from various eras add a playful, nostalgic, and often colorful touch.
These murals are excellent for creating a distinguished study, a vintage-inspired living room, or adding an unexpected artistic flourish to any space.
-
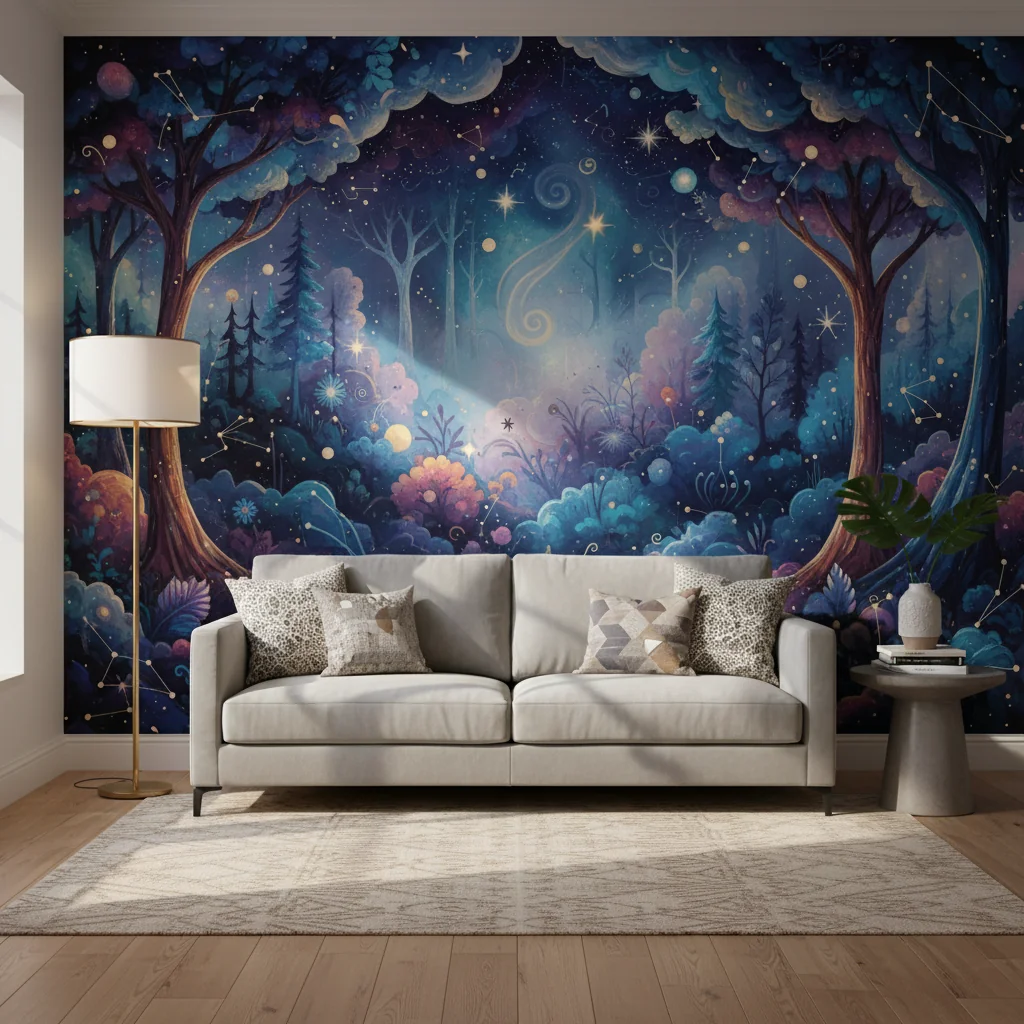
Children’s and Whimsical Murals: Designed to ignite imagination and create playful environments, these murals feature bright colors and engaging themes.
- Fantasy Worlds: Dragons, fairies, castles, and magical creatures transport children to enchanted realms.
- Space and Planets: Galaxies, astronauts, and celestial bodies inspire curiosity and wonder.
- Cartoon Characters and Illustrations: Beloved characters or charming illustrations create a friendly and fun atmosphere.
Ideal for nurseries, kids’ bedrooms, and playrooms, these murals foster creativity and provide a stimulating visual environment.
-
Textural and Faux Finish Murals: These murals mimic the look and feel of natural textures or luxurious finishes, offering an opulent or rustic touch without the cost or complexity of real materials.
- Brick Walls: Realistic brick patterns, from weathered red to painted white, add an industrial or rustic chic aesthetic.
- Concrete and Stone: Mimicking raw concrete, marble, slate, or other stone textures provides a contemporary, industrial, or natural feel.
- Wood Panels: Faux wood planks, shiplap, or intricate wood carvings introduce warmth and a natural element.
- Metallic and Fabric Effects: Designs that simulate shimmering metals, velvet, silk, or other luxurious fabrics add glamour and tactile appeal.
These are particularly effective for creating an accent wall that adds depth and tactile interest, often used in living rooms, dining rooms, or even commercial spaces.
The choice of style for your wall paper mural should align with the overall design narrative of your home and the specific function of the room. A vibrant, expansive mural can make a small room feel larger, while a subdued, monochromatic design can add sophistication without overwhelming. Starhouse emphasizes that the mural should complement, not compete with, your existing furnishings and architectural elements, creating a harmonious and aesthetically pleasing environment.
The Materials Behind the Masterpiece: Wall Paper Mural Composition
The material composition of a wall paper mural dictates its durability, ease of installation, washability, and overall aesthetic quality. Understanding these foundational materials is crucial for selecting a mural that not only looks stunning but also performs effectively in its intended environment. Starhouse prioritizes materials that offer both visual excellence and practical benefits for diverse home applications.
Modern wall paper murals are engineered from a variety of substrates, each with unique properties that impact its performance and suitability for different rooms and lifestyles. These materials are chosen for their ability to hold high-resolution prints, withstand environmental factors, and facilitate either straightforward DIY installation or professional application.
Common Wall Paper Mural Materials:
-
Non-Woven Materials: Non-woven wall paper murals are among the most popular choices due to their exceptional durability and ease of handling. They are made from a blend of natural and synthetic fibers, often cellulose and polyester, which are bonded together to create a stable, breathable, and tear-resistant sheet. This composition allows for a “paste-the-wall” application, where adhesive is applied directly to the wall, making installation cleaner and simpler than traditional “paste-the-paper” methods.
- Durability: Highly resistant to tearing, shrinking, and stretching. Maintains structural integrity over time.
- Breathability: Allows walls to breathe, reducing the risk of mold and mildew, especially in environments with fluctuating humidity.
- Washability: Typically wipeable with a damp cloth, making them suitable for active areas.
- Removability: Often designed for “strippable” or “peelable” removal, meaning they can be dry-stripped from the wall in full sheets without leaving significant residue or damaging the drywall.
- Environmental Consideration: Many non-woven materials are PVC-free and can be a more eco-conscious choice.
-
Vinyl Materials: Vinyl wall paper murals are highly durable and practical, making them an excellent choice for high-traffic areas, bathrooms, and kitchens. They consist of a vinyl layer laminated to a paper or fabric backing. The vinyl surface provides superior resistance to moisture, stains, and abrasion.
- Solid Vinyl: Features a solid sheet of vinyl, making it extremely durable and scrubbable. It is highly resistant to moisture and can withstand vigorous cleaning. However, solid vinyl is less breathable and can be more challenging to remove.
- Fabric-Backed Vinyl (Type II Commercial Grade): This is a premium vinyl option often used in commercial settings but gaining popularity in residential applications. It features a woven fabric backing that provides exceptional strength and dimensional stability, making it highly resistant to tears and punctures. It is also highly scrubbable and durable.
Extractable Definition: Volatile Organic Compounds (VOCs) are organic chemicals that have a high vapor pressure at room temperature, meaning they can easily evaporate into the air. These compounds can be emitted from various household products and building materials, including some paints and wallcoverings, and may contribute to indoor air pollution. The U.S. Environmental Protection Agency (EPA) provides guidance on indoor air quality, noting that some VOCs can have adverse health effects, though they do not directly regulate VOCs in household products. Starhouse is committed to offering materials that meet stringent safety standards.
When selecting vinyl murals, it is important to consider the VOC content, especially for indoor air quality. Many modern vinyl wallcoverings are manufactured to low-VOC standards, providing a safer option for your home. The U.S. EPA offers insights into VOCs in household products, emphasizing the importance of ventilation and choosing low-emission materials for better indoor air quality.
-
Paper-Backed Vinyl: This material combines a vinyl surface with a paper backing. It offers good durability and washability due to the vinyl face but is generally less robust than fabric-backed vinyl. Installation typically involves traditional paste-the-paper methods or pre-pasted options. Removal can be more challenging than non-woven materials, as the paper backing may tear.
-
Mylar (Foil) Materials: Mylar murals feature a thin film of polyester (Mylar) laminated to a paper or non-woven backing. They are known for their metallic, reflective finish, which adds a luxurious and often dramatic effect to a room. Mylar can be printed with various designs, creating shimmering patterns or reflective solid colors.
- Aesthetic: Provides a unique metallic sheen, adding glamour and light reflection.
- Durability: Generally durable and wipeable, but can show imperfections on the wall surface more readily due to its reflective nature.
- Installation: Requires very smooth wall surfaces and careful handling to avoid creasing or damage.
-
Fabric-Based Murals: These murals are printed directly onto woven fabric, such as polyester canvas or linen blends. They offer a luxurious, tactile finish and a softer, more artistic aesthetic compared to smoother vinyl or non-woven options. Fabric murals can be durable and resistant to tears, often installed with a heavy-duty adhesive or as peel-and-stick options.
- Texture: Provides a rich, tactile surface that adds warmth and depth.
- Artistic Appeal: Often used for reproductions of fine art or for a more organic, natural look.
- Durability: Good tear resistance; washability varies depending on the specific fabric and printing process.
Material Comparison Table:
| Material Type | Durability & Tear Resistance | Installation Method | Washability | Ideal Use & Aesthetic | Approx. Price Range (per sq ft) |
|---|---|---|---|---|---|
| Non-Woven | High; resistant to shrinking/stretching. | Paste-the-wall; DIY-friendly. | Wipeable with a damp cloth. | Versatile; bedrooms, living rooms, dining rooms; modern, clean finish. | $5 – $10 |
| Solid Vinyl | Very High; excellent abrasion & moisture resistance. | Paste-the-paper/wall (requires strong adhesive). | Scrubbable; highly resistant to stains. | High-traffic areas, bathrooms, kitchens; practical, durable. | $6 – $12 |
| Fabric-Backed Vinyl (Type II) | Exceptional; highly resistant to tears & punctures. | Paste-the-wall (professional recommended). | Scrubbable; commercial-grade resilience. | Commercial, high-traffic residential; robust, long-lasting. | $10 – $25+ |
| Paper-Backed Vinyl | Good; moderate tear resistance. | Paste-the-paper/wall; pre-pasted options. | Wipeable with a damp cloth. | General residential use; offers good balance of price/durability. | $4 – $8 |
| Mylar (Foil) | Moderate; can crease if mishandled. | Paste-the-paper/wall (very smooth surface required). | Wipeable; shows imperfections easily. | Accent walls, luxurious spaces; reflective, glamorous aesthetic. | $8 – $18 |
| Fabric-Based | Good to High; resistant to tears, soft touch. | Paste-the-wall; some peel-and-stick options. | Varies (check manufacturer); often gently wipeable. | Artistic, organic, luxurious spaces; tactile, natural feel. | $10 – $20+ |
When evaluating materials, consider the specific demands of your room. A bathroom mural requires excellent moisture resistance, whereas a child’s playroom benefits from high scrubbability. Starhouse recommends reviewing the manufacturer’s specifications for each mural to ensure its material properties align with your expectations for performance and longevity.
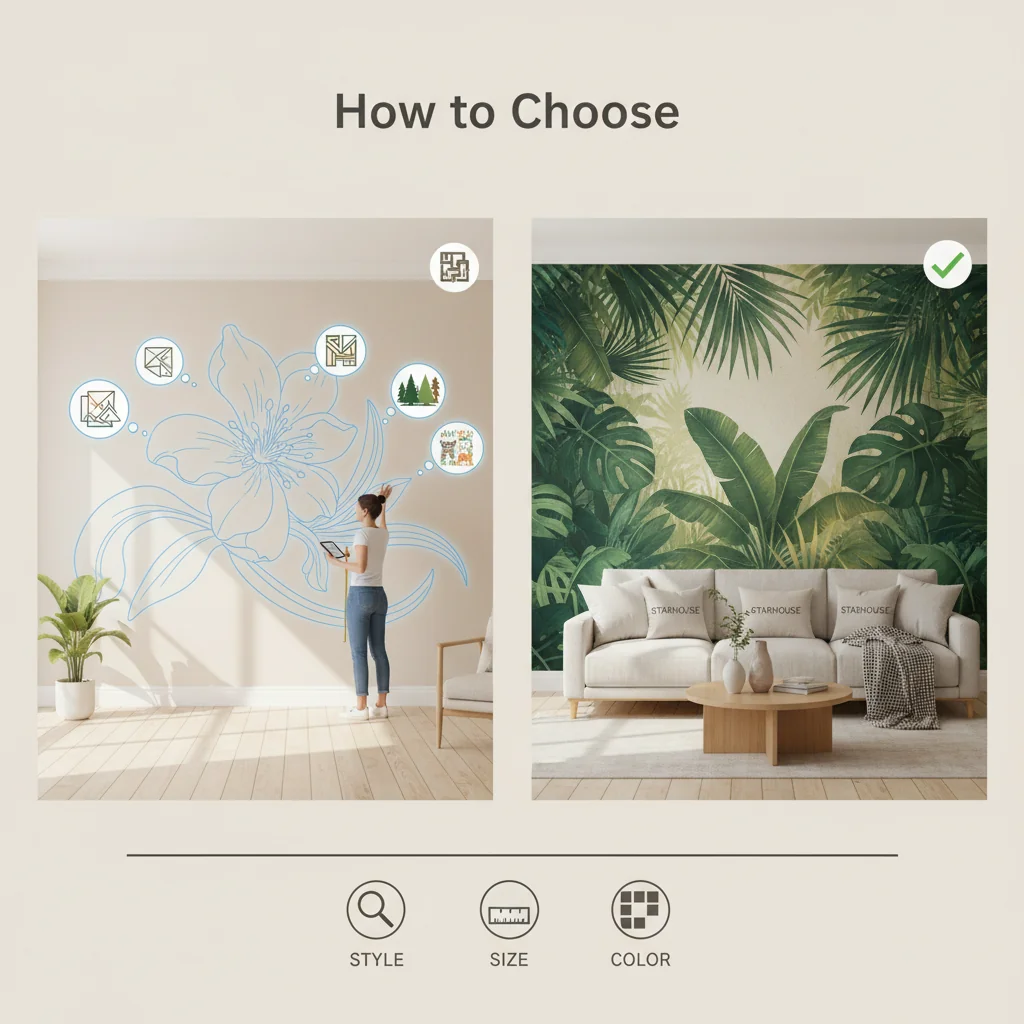
Selecting Your Perfect Wall Paper Mural: A Strategic Approach
Choosing the ideal wall paper mural involves a thoughtful analysis of your space, personal style, and practical considerations to ensure a harmonious and impactful result. A successful selection transforms a wall into an integrated piece of your home’s narrative, enhancing its beauty and functionality. Starhouse guides you through this process with precision, ensuring your choice is both aesthetically pleasing and perfectly suited to your environment.
The decision-making process extends beyond mere visual appeal; it encompasses how the mural interacts with natural and artificial light, existing furnishings, and the overall architectural flow of your home. A strategic approach prevents common design missteps and maximizes the mural’s potential to elevate your interior.
Key Factors to Consider When Choosing a Wall Paper Mural:
-
Room Function and Mood: The purpose of the room should heavily influence your mural choice. A bedroom might benefit from calming, serene landscapes or abstract patterns that promote relaxation, while a living room could feature a dynamic cityscape or a bold artistic statement that encourages conversation. For a home office, an inspiring nature scene or a subtle geometric pattern can foster focus and creativity. Children’s rooms, conversely, thrive with vibrant, imaginative themes.
- Bedrooms: Prioritize tranquil scenes (forests, soft abstracts), muted colors, and soft textures.
- Living Rooms: Consider grand landscapes, architectural vistas, or sophisticated abstract art as a focal point.
- Dining Rooms: Elegant botanical prints, classic art reproductions, or subtle geometrics can enhance the dining experience.
- Home Offices: Inspiring nature, cityscapes, or subtle patterns that promote concentration.
- Children’s Rooms: Playful characters, fantasy scenes, or educational maps that spark imagination.
-
Room Size and Scale: The scale of the mural’s design must be proportionate to the size of the room. A large, intricate pattern or expansive scene can overwhelm a small room, making it feel cramped. Conversely, a mural with too small a pattern can get lost in a vast space. For smaller rooms, consider murals with lighter colors and a sense of depth (e.g., a distant landscape) to create an illusion of space. For larger rooms, bold, large-scale designs or intricate patterns can fill the wall without feeling cluttered.
- Small Rooms: Opt for designs with open spaces, lighter colors, and a clear focal point. Avoid overly busy or dark patterns.
- Large Rooms: Can accommodate bolder colors, larger patterns, and more complex scenes. Use the mural to define zones or create a grand statement.
-
Lighting Conditions: Natural and artificial light significantly impact how a mural appears. Rooms with abundant natural light can handle darker, more saturated colors, which will appear vibrant. Rooms with limited natural light may benefit from murals with lighter backgrounds or reflective elements (like subtle metallic accents) to brighten the space. Consider how the mural will look at different times of day and under various artificial lighting scenarios.
- Bright Rooms: Darker, richer hues will maintain their vibrancy.
- Dim Rooms: Lighter colors, reflective surfaces, or murals with strong contrast can help brighten the space.
-
Existing Décor and Color Palette: The mural should complement your existing furniture, textiles, and wall colors. Identify dominant colors and underlying tones in your current décor. A mural can either match these tones for a cohesive look or introduce a complementary accent color to add visual interest. Consider the style of your furniture—is it modern, traditional, eclectic? The mural should align with this aesthetic.
- Cohesion: Select a mural with colors that are already present in your room or that belong to a harmonious color family.
- Contrast: A mural can introduce a pop of complementary color or a contrasting texture, but ensure it doesn’t clash with existing elements.
-
Material Properties and Maintenance: Refer back to the material discussion (non-woven, vinyl, peel-and-stick) and consider the practical aspects. A high-traffic hallway or a child’s room requires a durable, scrubbable material, such as vinyl. A master bedroom might allow for a more delicate fabric-based mural. If you anticipate frequent redecoration or live in a rental, peel-and-stick options are paramount for their removability.
- High-Traffic Areas: Choose highly durable and washable materials like fabric-backed vinyl.
- Moisture-Prone Areas: Opt for moisture-resistant vinyl murals.
- Temporary Décor/Rentals: Peel-and-stick murals offer easy, damage-free removal.
-
Budget: Wall paper murals vary significantly in price based on material, complexity of design, customization, and brand. Establish a realistic budget before you begin your search. While it’s tempting to opt for the lowest price, remember that quality materials and printing contribute to longevity and visual impact. Investing in a higher-quality mural can offer better durability and a more refined aesthetic over time.
- Entry-Level: Generally paper-backed vinyl or some non-woven options.
- Mid-Range: High-quality non-woven and standard vinyl.
- Premium: Custom designs, fabric-backed vinyl, and specialized materials like Mylar.
Using Samples and Digital Tools:
Before committing to a full wall paper mural, Starhouse highly recommends obtaining samples. Physical samples allow you to assess the true color, texture, and finish of the material in your specific lighting conditions. Hold samples against your wall at different times of day to see how light affects the design. Additionally, many online retailers offer visualization tools where you can upload a photo of your room and virtually apply a mural to see how it might look. While not perfectly accurate, these tools provide a valuable preliminary assessment.
By systematically addressing these factors, you ensure that your chosen wall paper mural is not just a beautiful addition, but a thoughtfully integrated element that enhances your home’s design and reflects your unique style. Starhouse is dedicated to providing the resources and selection necessary to make this a confident and inspiring choice.
Precision Planning: Sizing and Measuring for Your Wall Paper Mural
Accurate sizing and meticulous measuring are the most critical steps in ensuring a seamless and professional-looking wall paper mural installation. Incorrect measurements can lead to costly errors, including insufficient material or an ill-fitting design that compromises the entire aesthetic. Starhouse provides precise guidelines to help you measure your space with confidence, ensuring your mural fits perfectly and looks exactly as envisioned.
This planning phase is not merely about recording numbers; it involves understanding how the mural will interact with architectural features, accounting for potential wall irregularities, and incorporating necessary buffer room for trimming. Precision here saves time, effort, and expense during installation.
Step-by-Step Guide to Measuring Your Wall for a Mural:
-
Gather Your Tools: Before you begin, ensure you have the right equipment for accurate measurement:
- A reliable metal tape measure (at least 25 feet long for ease of use).
- A pencil and notepad for recording measurements.
- A step stool or ladder for reaching high points.
- A level (optional, but helpful for checking wall plumbness).
-
Measure the Width of Your Wall:
- Measure the horizontal distance of the wall from left to right at three different points: the top, the middle, and the bottom.
- Record all three measurements. Even if your walls appear perfectly straight, slight variations are common.
- Use the widest of these three measurements as your primary width.
-
Measure the Height of Your Wall:
- Measure the vertical distance of the wall from ceiling to floor at three different points: the far left, the middle, and the far right.
- Record all three measurements. Again, use the tallest of these three measurements as your primary height.
-
Account for Architectural Features (Doors, Windows, etc.):
- If your mural will cover a wall with doors, windows, or other permanent fixtures, you still need to measure the entire wall as if these features were not there. Murals are printed to cover the full wall, and you will trim around these obstructions during installation.
- However, if you are ordering a custom-sized mural and want a specific part of the image to align with a particular area (e.g., a tree to be next to a window), note the precise dimensions and locations of these features. Communicate these details clearly if you are ordering a custom design.
-
Add a Buffer (Critical Step):
- Always add an extra 2-4 inches to both your final width and height measurements. This extra material, known as the “bleed” or “buffer,” is crucial for ensuring complete coverage and allowing for precise trimming during installation. Walls are rarely perfectly square, and ceilings and floors are seldom perfectly level. This buffer accommodates these minor imperfections and provides room for error during hanging.
- For example, if your widest measurement is 144 inches and your tallest is 96 inches, order a mural that is at least 148 inches wide and 100 inches tall.
-
Consider Obstructions and Outlets:
- While you don’t subtract for outlets, it’s wise to note their locations. You will cut around them during installation. For safety, always turn off power to outlets before working near them.
- For permanent fixtures like built-in shelving, measure the wall sections around them accurately, treating each section as a separate surface if the mural design allows for it, or plan to trim carefully.
-
Review and Double-Check:
- Once you have your final measurements, double-check them. It is always better to measure twice and cut once (or, in this case, order once).
- Confirm that the dimensions you are providing to the mural supplier include the necessary buffer.
Understanding Mural Panelization:
Wall paper murals are typically supplied in vertical panels, designed to be hung side-by-side to form the complete image. The number of panels and their width depend on the overall mural size and the manufacturer’s specifications. For instance, a 10-foot wide mural might come in five 2-foot wide panels. When measuring, you are determining the total area, and the manufacturer will divide the image into appropriate panel sizes for printing.
For custom murals, you provide your exact wall dimensions (including the buffer), and the mural is printed to fit that specific size, often with the image scaled or cropped to best suit the aspect ratio. For standard-sized murals, you will select the size that most closely matches your buffered dimensions, understanding that some trimming may be required on all sides.
Dealing with Irregular Walls or Sloped Ceilings:
If you have irregular walls, such as those with non-90-degree corners or sloped ceilings, the buffer becomes even more critical. For sloped ceilings, measure the height at multiple points along the slope and use the tallest point for your overall height, ensuring you have enough material to trim along the angle. For complex angles or very irregular surfaces, consulting with a professional installer for precise measurements is highly recommended.
Starhouse emphasizes that precise measurement is the foundation of a successful wall paper mural installation. Taking the time to accurately measure and account for all variables will ensure your chosen mural fits flawlessly and delivers the intended visual impact.
Installation Insights: Bringing Your Wall Paper Mural to Life
The successful installation of a wall paper mural is a detailed process that demands careful preparation, precision, and patience. While many peel-and-stick murals are designed for confident DIYers, traditional paste-the-wall options often benefit from professional expertise to achieve a flawless finish. Starhouse provides essential guidance on both methods, empowering you to approach installation with the necessary knowledge and tools.
Proper surface preparation and meticulous panel alignment are paramount, regardless of the mural type. Rushing these steps can lead to visible seams, bubbles, or damage, compromising the mural’s visual integrity and longevity. This section outlines the general principles and specific steps for each primary installation method.
General Preparation Steps for All Wall Paper Murals:
-
Clean the Wall Surface: The wall must be clean, dry, smooth, and free of dust, dirt, grease, or mildew. Wash the wall with a mild detergent solution, rinse thoroughly, and allow it to dry completely (at least 24 hours) before installation. For glossy surfaces, a light sanding can help adhesive grip.
-
Repair and Smooth the Wall: Fill any holes, cracks, or imperfections with spackle or joint compound. Sand these areas smooth once dry. Any bumps or textures on the wall will likely show through the mural, especially with thinner materials or highly reflective finishes like Mylar. A perfectly smooth surface is non-negotiable for a professional look.
-
Prime the Wall: Applying a high-quality primer is a crucial step that enhances adhesion, seals the wall, and can make future removal easier. For traditional murals, use a universal wallpaper primer. For peel-and-stick murals, a primer designed for adhesive wallcoverings can improve stickiness and prevent paint lift upon removal. Allow the primer to dry completely according to manufacturer instructions, typically 24-48 hours.
-
Remove Obstructions: Temporarily remove switch plates, outlet covers, and any wall decor. Turn off power to outlets for safety if you will be working near them.
-
Gather Your Tools: Ensure you have all necessary tools organized and within reach:
- Tape measure, pencil, level, straightedge.
- Utility knife with fresh blades (essential for clean cuts).
- Smoothing tool (e.g., plastic smoother, wallpaper brush).
- Clean cloths/sponges.
- For paste-the-wall: Wallpaper paste, paste roller/brush, bucket, drop cloths.
- For peel-and-stick: Squeegee, possibly a heat gun for stubborn bubbles (used cautiously).
-
Layout and Reference Lines: Unroll and lay out all mural panels to ensure they are correct and to familiarize yourself with the full design. Most murals are hung from left to right or right to left. Use a level and a pencil to draw a plumb (perfectly vertical) reference line on the wall where your first panel will be placed. This line is absolutely critical for ensuring subsequent panels are hung straight and the entire mural remains level. Do NOT rely on the ceiling or floor as a straight reference.
Installation Method 1: Paste-the-Wall Murals (Non-Woven, Fabric-Backed Vinyl)
This method involves applying adhesive directly to the wall, making it generally cleaner and more forgiving for adjustments than paste-the-paper.
-
Apply Paste to the Wall: Using a roller or brush, apply a generous, even layer of wallpaper paste to the section of the wall where the first panel will be placed, slightly wider than the panel itself. Ensure consistent coverage, especially along the edges.
-
Hang the First Panel: Carefully align the first panel with your plumb reference line, starting from the top. Press the panel gently onto the pasted wall. Allow for a 2-4 inch overlap at the top and bottom for trimming.
-
Smooth Out Bubbles: Use a smoothing tool or wallpaper brush to gently work out any air bubbles or wrinkles, moving from the center of the panel outwards towards the edges. Avoid pressing too hard initially.
-
Trim Excess: Once the panel is smooth and positioned, use a sharp utility knife and a straightedge to carefully trim the excess material at the ceiling and floor lines. Change blades frequently for clean cuts.
-
Hang Subsequent Panels: Apply paste for the next section of the wall. Take the second panel and align it precisely with the first. Many murals are designed with a slight overlap (e.g., 0.5-1 inch) to ensure seamless pattern matching. Carefully match the design, then smooth the panel as before.
-
Seam Rolling (Optional but Recommended): For a truly invisible seam, once two panels are hung and smoothed, use a seam roller (a small, firm roller) to gently press down the overlapping or butt-jointed edges. Be careful not to stretch the material. Wipe away any excess paste immediately with a clean, damp sponge.
-
Continue and Finish: Repeat the process for all remaining panels. After installation, allow the mural to dry completely, typically 24-48 hours. Avoid touching or cleaning the mural during this drying period.
Installation Method 2: Peel-and-Stick Murals (Self-Adhesive)
This method is known for its DIY-friendliness and removability, but still requires precision.
-
Hang the First Panel: Peel back only a few inches of the backing paper from the top of the first panel. Align the exposed adhesive edge with your plumb reference line on the wall, starting from the top. Leave a 2-4 inch overlap at the ceiling.
-
Smooth and Unpeel Gradually: Gently press the top portion of the panel onto the wall. As you work your way down, slowly peel off more of the backing paper with one hand while simultaneously smoothing the mural onto the wall with a squeegee in the other hand. Work from the center outwards to push out air bubbles.
-
Reposition if Needed: One of the benefits of peel-and-stick is its repositionability. If you encounter a large bubble or misalignment, you can carefully peel back the section and reapply. However, excessive repositioning can reduce the adhesive’s effectiveness.
-
Trim Excess: Once the entire panel is applied and smooth, use a sharp utility knife and a straightedge to trim the excess material at the ceiling, floor, and side edges.
-
Hang Subsequent Panels: Align the next panel precisely with the first. Peel-and-stick murals typically require a butt-joint installation (panels meet edge-to-edge without overlapping). Carefully match the design, then smooth the panel onto the wall, gradually removing the backing paper.
-
Address Bubbles: For persistent small bubbles, you can use a pin to gently puncture them and then smooth the area. Be cautious not to damage the mural’s surface.
-
Final Smooth: After all panels are installed, do a final pass with your squeegee over the entire mural, paying extra attention to seams and edges, to ensure maximum adhesion.
When to Consider Professional Installation:
While peel-and-stick murals are often DIY-friendly, professional installation is highly recommended for:
- Large or Complex Murals: Murals covering very wide or tall walls, or those with intricate patterns that demand precise alignment.
- Traditional Paste-the-Wall Murals: These require specific expertise in paste application, working with wet material, and achieving invisible seams.
- Textured or Delicate Materials: Mylar or certain fabric-based murals can be challenging to handle without specialized experience.
- Irregular Walls: Rooms with sloped ceilings, numerous architectural features, or uneven surfaces benefit from a professional’s problem-solving skills.
A professional installer possesses the experience, tools, and techniques to ensure your wall paper mural is installed flawlessly, maximizing its visual impact and longevity. Starhouse advises that for a significant investment in a mural, professional installation can be a worthwhile expense to guarantee a perfect result.
Mastering the Art of Wall Paper Mural Styling and Pairing
Integrating a wall paper mural into your home décor is an art form that extends beyond mere installation; it requires thoughtful styling and strategic pairing with furnishings, textiles, and lighting to create a cohesive, balanced, and impactful space. A well-styled mural becomes the anchor of a room, dictating its mood and informing subsequent design choices. Starhouse provides expert insights to help you harmonize your mural with its surroundings, transforming your vision into a beautifully realized interior.
The mural, as a dominant visual element, sets the tone. Your task is to ensure that other elements in the room support and enhance its presence, rather than compete with or diminish it. This involves a delicate balance of color, texture, scale, and form.
Strategies for Styling and Pairing Your Wall Paper Mural:
-
Establish the Mural as the Focal Point: Decide whether your mural will be the room’s primary focal point or a complementary backdrop. For most wall paper murals, especially those with grand scenes or bold designs, they are intended to be the star. Position key furniture pieces (e.g., a sofa, bed, dining table) to face or be centered against the mural wall. Keep other walls relatively simple in color and minimal in décor to allow the mural to shine.
- Placement: Install the mural on the wall most visible upon entering the room or a wall that anchors a main seating area.
- Simplicity: Avoid overcrowding the mural wall with excessive furniture or competing artwork.
-
Harmonize with Color Palettes: Extract colors directly from your mural and incorporate them into your room’s accessories and textiles. This creates a visually cohesive narrative. Use the dominant colors of the mural for larger elements like rugs or accent chairs, and secondary colors for smaller items such as throw pillows, decorative objects, or floral arrangements. Conversely, if your mural is monochromatic or subdued, introduce pops of color through accessories to add vibrancy.
- Picking Colors: Select 2-3 main colors from the mural for your room’s palette.
- Balancing: Use lighter, neutral tones for other walls and larger furniture pieces to prevent the room from feeling overwhelmed.
-
Balance with Furniture and Layout: The style and scale of your furniture should complement the mural. For a mural with a grand, historical scene, classic or transitional furniture might be appropriate. For a modern abstract mural, sleek, contemporary pieces will create a cohesive look. Ensure furniture doesn’t block significant portions of the mural. Low-profile furniture or pieces with open legs can maintain visibility and a sense of spaciousness.
- Scale: Large murals can handle larger furniture pieces; smaller murals may require more delicate items.
- Visibility: Arrange furniture to allow maximum viewing of the mural, leaving breathing room around it.
-
Incorporate Textures: Introduce varying textures to add depth and tactile interest that complements the visual texture of the mural. If your mural depicts a lush forest, bring in natural wood, woven baskets, or linen textiles. For a sleek cityscape mural, consider metallic accents, smooth leather, or polished stone. Contrasting textures prevent a room from feeling flat and add a layer of sophistication.
- Natural Murals: Pair with wood, rattan, wool, linen.
- Modern/Abstract Murals: Combine with glass, metal, smooth fabrics, concrete elements.
-
Strategic Lighting: Lighting can dramatically enhance a wall paper mural. Consider installing picture lights above the mural or recessed lighting that washes the wall with light to highlight its details and colors. Dimmers allow you to adjust the intensity, creating different moods. Ensure that light sources do not create harsh glare or shadows that detract from the mural’s appearance.
- Accent Lighting: Use track lighting, picture lights, or wall sconces to draw attention to the mural.
- Ambient Lighting: Ensure overall room lighting supports the mural’s colors without distorting them.
-
Accessorize Thoughtfully: Choose accessories that echo the mural’s theme, color, or style without competing for attention. For example, if your mural features a mountain scene, a simple ceramic vase with natural branches or a few subtly framed photos of similar landscapes would work well. Avoid busy gallery walls on adjacent walls, as this can create visual clutter. Instead, opt for one or two carefully chosen pieces that reinforce the mural’s narrative.
- Less is More: Allow the mural to be the dominant artwork.
- Echo Themes: Select accessories that subtly reference the mural’s subject matter or color scheme.
-
Consider Adjacent Walls: The color of adjacent walls should be carefully chosen. Often, a neutral color pulled from the mural (e.g., a background color, a sky tone) works best to create a seamless transition and allow the mural to stand out. Avoid bold or contrasting colors on adjacent walls unless it’s part of a very deliberate, maximalist design strategy.
- Neutrality: Use muted or neutral paint colors on surrounding walls.
- Flow: Ensure the transition from the mural to the painted walls feels natural and unforced.
By applying these styling and pairing principles, you elevate your wall paper mural from a mere wall covering to a central, integrated element of your home’s design. Starhouse encourages experimentation and a keen eye for detail to create a space that is both beautiful and uniquely yours.
Maintaining Your Mural’s Brilliance: Care and Longevity
Proper care and maintenance are essential for preserving the vibrant colors and structural integrity of your wall paper mural, ensuring it remains a stunning focal point in your home for years to come. The specific care routine depends largely on the mural’s material, as different compositions possess varying degrees of durability and washability. Starhouse provides precise guidelines to help you protect your investment and maintain your mural’s pristine appearance.
Neglecting appropriate care can lead to fading, discoloration, or damage, diminishing the mural’s visual impact. Adhering to manufacturer recommendations for cleaning and environmental protection extends the life of your mural and keeps it looking fresh and new.
General Care Principles for All Wall Paper Murals:
-
Regular Dusting: Dust accumulation can dull the mural’s appearance. Regularly dust the surface using a soft, dry microfiber cloth or a soft-bristled brush attachment on your vacuum cleaner (on a low setting, held slightly away from the surface). Always move in a gentle, downward motion.
-
Immediate Spot Cleaning: Address spills or marks as soon as they occur. The longer a stain sits, the harder it is to remove. Always test any cleaning solution on an inconspicuous area of the mural (e.g., a small piece of leftover material or a hidden corner) before applying it to the main surface.
-
Avoid Abrasive Cleaners: Never use harsh chemicals, abrasive scrubbers, or bleach-based cleaners on any wall paper mural, regardless of its material. These can strip colors, damage the surface, or leave permanent marks.
-
Protect from Direct Sunlight: Prolonged exposure to direct sunlight can cause colors to fade over time, especially in murals with vibrant hues. Consider using UV-blocking window treatments (blinds, shades, or sheer curtains) in rooms where the mural receives intense sunlight. This is one of the most critical factors for long-term color preservation.
-
Control Humidity and Temperature: Extreme fluctuations in humidity and temperature can affect the mural’s adhesion and material integrity. Maintain a stable indoor environment, ideally between 68-72°F (20-22°C) and 30-50% relative humidity. Excessive humidity can lead to bubbling or mold growth, while overly dry conditions can cause shrinkage or cracking.
Material-Specific Cleaning Guidelines:
The method of cleaning depends heavily on the mural’s material type, as indicated by its washability rating:
-
Non-Woven Murals (Wipeable): These are generally easy to clean. Use a soft, damp cloth or sponge with a small amount of mild, non-abrasive soap (like dish soap) and warm water. Gently wipe the affected area, then immediately follow with a clean, damp cloth to remove any soap residue. Pat dry with a clean, soft towel. Avoid saturating the material.
-
Vinyl Murals (Washable/Scrubbable): Solid vinyl and fabric-backed vinyl murals are the most durable and resistant to moisture. They can be cleaned more rigorously than non-woven types. Use a soft sponge or cloth with a mild detergent solution. For stubborn stains, a soft-bristled brush can be used gently. Rinse thoroughly with a clean, damp cloth to remove all soap residue, then dry. These materials are excellent for kitchens and bathrooms due to their superior water resistance.
-
Paper-Backed Vinyl Murals (Washable): Similar to non-woven, these are generally wipeable. Use a lightly damp cloth with mild soap, being careful not to over-saturate, especially near seams, as water can seep into the paper backing. Rinse and dry promptly.
-
Mylar (Foil) Murals (Wipeable): Mylar surfaces are smooth and generally easy to wipe clean with a soft, damp cloth and mild soap. However, their reflective nature means that streaks or water spots can be more noticeable. Wipe gently and dry immediately with a clean, lint-free cloth to prevent water marks. Avoid any abrasive contact that could scratch the metallic finish.
-
Fabric-Based Murals (Varies – Check Manufacturer): Care for fabric murals is highly dependent on the specific fabric and printing process. Some may be gently wipeable with a dry or slightly damp cloth, while others may require specialized cleaning or are strictly dry-clean only. Always refer to the manufacturer’s specific instructions for fabric murals, as improper cleaning can cause irreversible damage.
Addressing Minor Damage:
-
Small Tears or Rips: For minor tears, carefully apply a small amount of clear, specialized wallpaper repair adhesive under the torn edge and press it back into place. For larger tears, a patch from leftover mural material might be necessary, carefully cut to match the pattern.
-
Bubbles: For persistent bubbles that appear after drying, you can sometimes carefully use a small syringe to inject a tiny amount of wallpaper adhesive into the bubble, then gently smooth it out with a squeegee. Wipe away any excess adhesive immediately. This technique is more effective for traditional paste murals than peel-and-stick.
-
Peeling Seams: If seams begin to peel, re-apply a small amount of seam adhesive (specifically designed for wallpaper) under the edge and press firmly. Wipe away excess adhesive.
By following these meticulous care instructions, you ensure that your wall paper mural from Starhouse remains a vibrant, impactful, and lasting element of your home’s design. Regular, gentle maintenance is the key to its enduring beauty.
Common Pitfalls to Avoid When Choosing and Installing Wall Paper Murals
While wall paper murals offer immense transformative potential, certain common mistakes in their selection and installation can lead to disappointing results, compromising both aesthetics and longevity. Recognizing these pitfalls allows for proactive prevention, ensuring your mural project is a resounding success. Starhouse highlights these crucial areas to help homeowners navigate the process with informed precision.
Avoiding these errors is as important as following the correct procedures. A single misstep, whether in measurement or material choice, can undermine the entire investment and visual impact of your chosen mural.
-
Incorrect Measurements: This is arguably the most frequent and costly mistake. Underestimating dimensions or failing to add sufficient buffer material (2-4 inches on all sides) can result in a mural that is too small, leaving unsightly gaps at the edges, ceiling, or floor. Conversely, over-ordering excessively means unnecessary waste. Always measure at multiple points and add the recommended buffer.
- Consequence: Gaps, misaligned patterns, or insufficient material.
- Prevention: Measure width and height at three points each, use the largest measurements, and add a 2-4 inch buffer to both dimensions.
-
Inadequate Wall Preparation: Applying a mural to an unclean, uneven, or improperly primed wall drastically impacts its appearance and adhesion. Dust, dirt, grease, existing wallpaper texture, or unpatched holes will show through the mural, creating an amateur finish. Paint that is peeling or highly porous will also affect adhesion.
- Consequence: Bubbles, wrinkles, visible imperfections, poor adhesion, or premature peeling.
- Prevention: Clean, repair, sand, and prime walls thoroughly. Ensure walls are completely dry before installation.
-
Ignoring Scale and Proportion: Selecting a mural with a pattern or image that is too large for a small room, or too small for a vast wall, can throw off the entire room’s balance. A busy, large-scale design can overwhelm a compact space, making it feel cramped, while a delicate pattern on an expansive wall might appear insignificant.
- Consequence: Overwhelmed or underwhelmed room, visual imbalance.
- Prevention: Consider the room’s dimensions. Opt for open, lighter designs in small spaces; embrace bold, larger patterns in spacious areas.
-
Poor Color Matching and Styling: Choosing a mural whose colors or style clash with existing furniture, flooring, or other décor elements creates a disjointed and unharmonious look. The mural should enhance, not compete with, the room’s established aesthetic.
- Consequence: Visual discord, an uninviting atmosphere.
- Prevention: Obtain samples to test colors in your room’s lighting. Consider the overall color palette and style of your existing décor.
-
Rushing the Installation Process: Impatience during installation, especially with aligning panels or smoothing out bubbles, is a primary cause of visible seams, misaligned patterns, and trapped air. Each step, from drawing plumb lines to trimming edges, requires meticulous attention.
- Consequence: Visible seams, misaligned images, bubbles, wrinkles, or torn material.
- Prevention: Dedicate ample time. Follow instructions precisely. Use a plumb line for the first panel. Work slowly and methodically.
-
Choosing the Wrong Material for the Environment: Installing a non-washable paper mural in a high-humidity bathroom or a high-traffic kitchen will lead to premature damage and deterioration. Similarly, a delicate material might not withstand the rigors of a child’s playroom.
- Consequence: Damage from moisture, stains, or abrasion; reduced lifespan.
- Prevention: Match the mural material’s properties (washability, durability, moisture resistance) to the room’s function and environmental conditions.
-
Neglecting the Importance of Lighting: How natural and artificial light interacts with your mural is crucial. A highly reflective mural (like Mylar) in a room with harsh overhead lighting can create glare. A dark mural in a dimly lit room might appear even darker and less vibrant than intended.
- Consequence: Glare, faded appearance, or distorted colors.
- Prevention: Assess the mural sample in your room’s lighting conditions. Consider how lighting choices will impact the mural’s visual effect.
-
Overlooking Professional Installation for Complex Projects: While DIY is appealing, complex murals, large walls, or intricate material types often benefit significantly from professional installation. Attempting a challenging installation without experience can lead to frustration and a suboptimal finish.
- Consequence: Subpar finish, visible errors, wasted material, increased stress.
- Prevention: Evaluate your skill level and the mural’s complexity. For significant investments or challenging projects, hire a qualified professional.
By being aware of these common pitfalls and taking proactive steps to avoid them, you can confidently select and install a wall paper mural that truly enhances your home, providing lasting beauty and impact. Starhouse champions informed decision-making to ensure your design aspirations are perfectly realized.
The Evolving Landscape: Current Trends in Wall Paper Murals
The world of interior design is dynamic, and wall paper murals are at the forefront of this evolution, constantly adapting to new aesthetics, technologies, and homeowner preferences. Current trends in wall paper murals reflect a desire for personalized, immersive, and often nature-inspired spaces that offer both visual appeal and emotional resonance. Starhouse stays abreast of these developments, curating designs that embody contemporary style and enduring appeal.
These trends are driven by a convergence of technological advancements in printing, a renewed appreciation for craftsmanship, and a global shift towards more mindful and expressive living environments. From digital art to sustainable materials, murals are more versatile and impactful than ever before.
Key Trends Dominating Wall Paper Murals in 2026:
-
Biophilic Design and Nature Immersion: This trend emphasizes connecting indoor spaces with the natural world. Murals depicting lush, dense forests, expansive mountain ranges, serene ocean vistas, or intricate botanical illustrations are highly sought after. These designs often feature rich greens, earthy browns, and calming blues, creating a sense of tranquility and well-being. The goal is to bring the restorative qualities of nature into the home, fostering a peaceful and rejuvenating atmosphere.
- Examples: Panoramic forest scenes, abstract leaf patterns, cloudscapes, wildflower fields.
- Impact: Promotes relaxation, reduces stress, enhances connection to nature.
-
Abstract Geometrics and Organic Forms: Moving beyond rigid lines, current geometric trends incorporate softer, more fluid shapes and organic curves. Abstract designs often feature muted, sophisticated color palettes or bold, contrasting hues, creating dynamic visual interest without being overly representational. This trend appeals to those seeking a modern, artistic, and sophisticated aesthetic that can be interpreted personally.
- Examples: Arches, wavy lines, abstract color blocks, deconstructed patterns.
- Impact: Adds contemporary elegance, visual movement, and artistic flair.
-
Vintage Revival and Historical Narratives: A resurgence of interest in historical aesthetics brings back vintage maps, classical art reproductions, and retro-inspired patterns. This trend often incorporates sepia tones, aged textures, and intricate detailing to evoke a sense of nostalgia, history, and cultured elegance. It’s about telling a story through design and celebrating the beauty of the past.
- Examples: Antique world maps, Renaissance paintings, Art Deco patterns, Chinoiserie.
- Impact: Creates a sophisticated, timeless, and culturally rich environment.
-
Maximalism with Thoughtful Curation: While minimalism has had its reign, a more refined maximalism is emerging. This involves rich, layered designs with intricate patterns, bold colors, and an abundance of detail, but executed with a sense of purpose and curation rather than clutter. Murals in this style might feature elaborate floral motifs, dense jungle scenes, or fantastical illustrations that create a truly immersive and opulent experience.
- Examples: Grandiflora patterns, baroque designs, rich tapestry-like visuals.
- Impact: Creates a luxurious, dramatic, and highly personalized space.
-
Textural Illusions and Tactile Appeal: Advancements in printing technology allow murals to mimic realistic textures with stunning accuracy. Murals that simulate concrete, exposed brick, natural wood planks, distressed plaster, or woven fabrics are gaining popularity. These designs add depth and a tactile dimension to walls without the expense or installation complexity of actual materials, offering an industrial chic or rustic charm.
- Examples: Faux brick, concrete, marble, shiplap, linen textures.
- Impact: Adds depth, realism, and a sophisticated material-driven aesthetic.
-
Customization and Personalization: The ability to create truly bespoke wall paper murals is a significant trend. Homeowners are increasingly seeking custom designs, whether it’s scaling an image to their exact wall dimensions, incorporating personal photographs, or commissioning unique artwork. This allows for unparalleled personalization, ensuring the mural is a unique reflection of the homeowner’s identity and vision.
- Examples: Personalized family photo collages, commissioned digital art, murals tailored to specific room dimensions and themes.
- Impact: Creates a one-of-a-kind, highly personal, and meaningful space.
-
Sustainability and Eco-Conscious Materials: There is a growing demand for environmentally friendly wall paper murals. Manufacturers are responding by offering PVC-free options, murals made from recycled content, water-based inks, and materials sourced from sustainably managed forests. This trend reflects a broader consumer awareness of environmental impact and a desire for healthier indoor living spaces.
- Examples: Non-woven materials from recycled fibers, murals printed with low-VOC or zero-VOC inks.
- Impact: Supports environmental responsibility and promotes healthier indoor air quality.
These trends highlight the wall paper mural’s continuing evolution as a versatile and powerful design tool. By embracing these contemporary aesthetics and technological innovations, Starhouse ensures its collection remains at the forefront of home décor, offering inspiring and relevant options for every discerning homeowner.
Sources
Frequently Asked Questions About Wall Paper Murals
Can I install a wall paper mural myself, or do I need a professional?
Many modern wall paper murals, particularly peel-and-stick (self-adhesive) types, are designed for confident DIY installation, especially for smaller walls or those with minimal obstructions. However, traditional paste-the-wall murals, large-format designs, complex patterns requiring precise alignment, or walls with irregular features often benefit significantly from professional installation. A professional ensures a flawless finish, seamless seams, and proper handling of delicate materials, maximizing the mural’s visual impact and longevity.
Are wall paper murals removable, and will they damage my walls?
The removability of a wall paper mural depends entirely on its material and installation method. Peel-and-stick murals are specifically engineered for easy, damage-free removal, making them ideal for renters or those who frequently redecorate. Many non-woven paste-the-wall murals are also designed to be “strippable” or “peelable,” coming off in full sheets without leaving significant residue. However, older or lower-quality traditional murals, particularly those with paper backings, may require more effort to remove and could potentially cause minor damage to drywall or paint if not removed carefully or if the wall was not properly primed beforehand.
How much does a wall paper mural cost?
The cost of a wall paper mural varies significantly based on material, size, design complexity, and customization options, typically ranging from $4 to $25+ per square foot. Entry-level options, often paper-backed vinyl or basic non-woven designs, may fall on the lower end. Higher-quality non-woven, durable vinyl (especially commercial-grade fabric-backed), and custom-designed murals with specialized finishes will be at the higher end of this spectrum. Installation costs, if hiring a professional, are an additional expense and can range from $3-$10 per square foot, depending on location and project complexity.
Can I use a wall paper mural in a bathroom or kitchen?
Yes, wall paper murals can be successfully used in bathrooms and kitchens, provided you select the appropriate material. For high-humidity environments like bathrooms and splash-prone areas in kitchens, vinyl murals (especially solid vinyl or fabric-backed vinyl) are highly recommended. These materials offer superior moisture resistance, durability, and are typically scrubbable, allowing for easy cleaning of splashes and spills. Avoid paper-based or delicate fabric murals in these areas, as they are more susceptible to moisture damage and mold growth.
How long do wall paper murals typically last?
A high-quality wall paper mural, properly installed and maintained, can last anywhere from 5 to 15+ years. The longevity is primarily determined by the material type (vinyls and non-wovens generally outlast paper-based options), the quality of installation, and environmental factors. Murals exposed to direct, prolonged sunlight without UV protection may fade over time. Those in high-traffic or high-humidity areas will last longer if made from durable, washable materials. Regular, gentle cleaning and stable room conditions contribute significantly to a mural’s extended lifespan.
What is the difference between wallpaper and a wall paper mural?
The fundamental difference lies in their visual composition and design intent. Traditional wallpaper features a repeating pattern that seamlessly covers an entire wall, creating a continuous background texture or motif. Its design is engineered to repeat both horizontally and vertically. A wall paper mural, conversely, is a single, large-scale, non-repeating image or artwork that spans an entire wall or a significant portion of it. Each panel is a specific part of the larger picture, designed to be installed in sequence to form one cohesive visual statement, acting as a focal point rather than a background pattern.
Are wall paper murals environmentally friendly?
The environmental friendliness of wall paper murals varies greatly by manufacturer and material. Many modern murals are designed with sustainability in mind, utilizing PVC-free materials, non-woven substrates made from recycled content, and water-based or low-VOC (volatile organic compound) inks. Some manufacturers also source materials from sustainably managed forests. When seeking an eco-conscious option, look for certifications such as FSC (Forest Stewardship Council) for paper content, Greenguard Gold for low chemical emissions, or explicit statements about PVC-free or recycled materials and water-based inks. These choices contribute to better indoor air quality and reduced environmental impact.
Conclusion: Your Vision, Realized with Starhouse
The wall paper mural stands as a testament to the power of design to transform, inspire, and personalize a living space. Far beyond a simple wall covering, it is a curated artwork that defines ambiance, tells a story, and reflects individual style with unparalleled impact. From the serene embrace of a biophilic landscape to the dynamic energy of an abstract geometric, each mural offers a unique opportunity to craft an environment that resonates deeply with your aesthetic and functional needs.
Navigating the myriad options—from material science and precise measurement to styling nuances and long-term care—requires an authoritative guide. Starhouse is dedicated to being that trusted resource, empowering you with the knowledge and confidence to make informed decisions. We understand that your home is a canvas for your life, and every element contributes to its unique narrative. Our commitment is to curate a collection that not only meets the highest standards of quality and design but also fuels your imagination, enabling you to bring your most aspirational visions to life.
As Starhouse meticulously curates its inaugural collection of exquisite wall paper murals and home décor essentials, we invite you to be part of this exciting journey. Your discerning taste and unique vision are invaluable to us. We are building a selection tailored to the aspirations of homeowners across the United States, and your input can help shape what we offer. Share what you want for your space and get early access to our exclusive collection. Tell us what you’re looking for and be among the first to experience the Starhouse difference, where sophisticated design meets effortless living.