A mural is a work of art directly applied or affixed to a wall or ceiling, fundamentally transforming a space by integrating imagery and design into the architectural fabric. These expansive visual statements range from intricate hand-painted masterpieces to technologically advanced digital prints on various substrates, offering an unparalleled opportunity to imbue a room with character, narrative, and depth. Unlike framed art that hangs on a wall, a mural becomes an inseparable part of the wall itself, creating an immersive experience that can alter perception of scale, mood, and function within any interior.
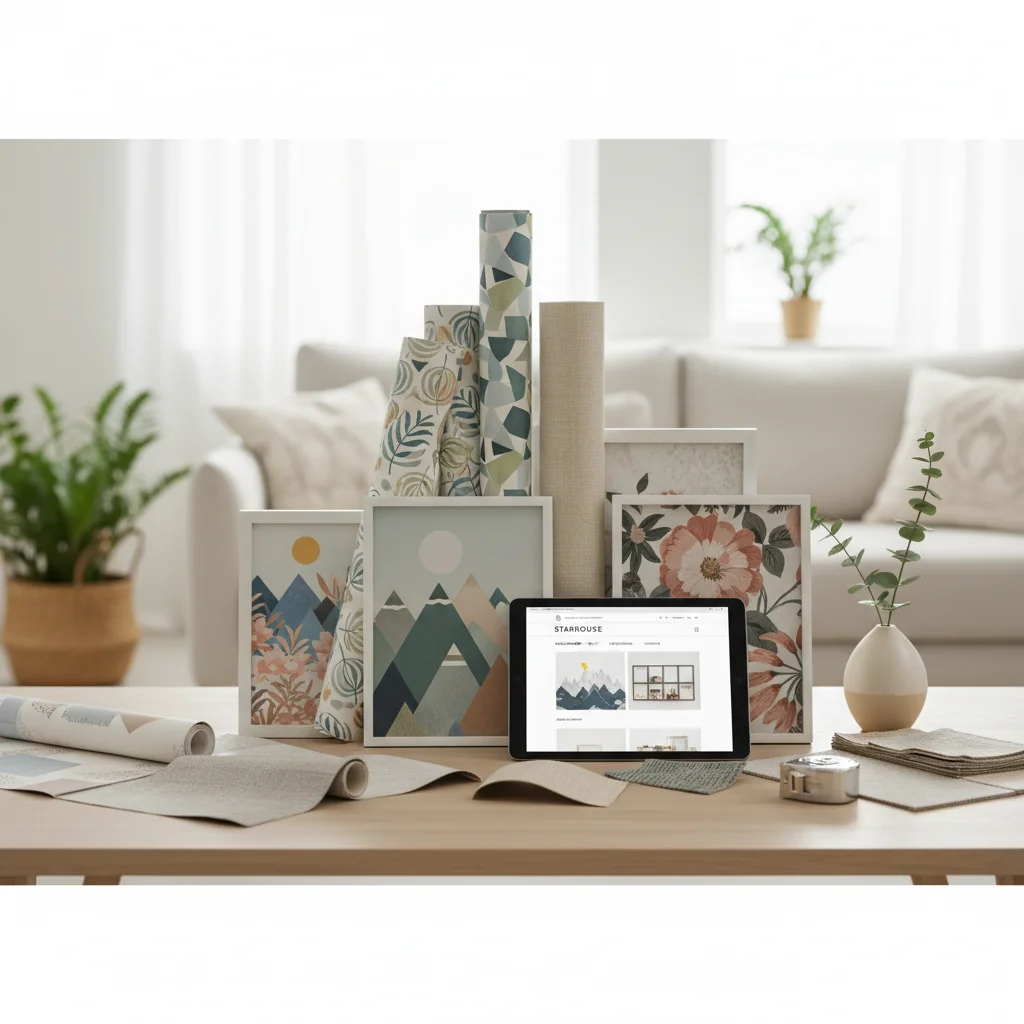
At Starhouse, we understand that the right wall mural can redefine a home, acting as a powerful focal point or a subtle backdrop that enhances your personal style. This comprehensive guide delves into every facet of wall murals, equipping you with the knowledge to select, size, install, and care for the perfect artistic expression for your living environment. We will explore the diverse types, materials, and styles available, provide precise guidance on measurement and installation, and offer expert advice on integrating these captivating artworks into your home’s existing décor, ensuring your chosen mural is a lasting source of inspiration and beauty.
Key takeaways
- Murals are permanent or semi-permanent wall art that integrate directly with a room’s architecture, offering unique aesthetic and spatial transformations.
- Selection involves considering material types like peel-and-stick, non-woven, or traditional paper, each offering distinct installation, durability, and texture characteristics.
- Accurate measurement is paramount, requiring precise height and width calculations, accounting for architectural features, and adding bleed for a flawless fit.
- Installation methods vary significantly by mural type, ranging from DIY-friendly peel-and-stick applications to professional-grade traditional pasting and hand-painting.
- Proper care, including gentle cleaning and avoiding harsh chemicals, ensures the longevity and vibrancy of your mural for years to come.
- Murals enhance interior design by serving as focal points, defining zones, or expanding perceived space, requiring thoughtful coordination with furnishings and lighting.
Understanding Wall Murals: A Definitive Definition
A wall mural is an artwork applied directly to a wall, ceiling, or other large permanent surface, designed to be an integral part of the architectural space rather than a standalone piece. This form of art transforms a flat surface into a dynamic visual experience, often covering an entire wall or a significant portion of it to create an immersive environment. Murals serve as powerful design elements, capable of establishing a mood, telling a story, or expanding the perceived dimensions of a room.
Historically, murals have adorned ancient temples, public buildings, and private residences, evolving from frescoes and mosaics to modern digital prints and hand-painted compositions. The defining characteristic of a mural is its permanent or semi-permanent attachment to the architectural structure, distinguishing it from conventional framed artwork or tapestries. Modern wall murals, especially those crafted from advanced digital printing techniques, offer unprecedented versatility in imagery, scale, and material, making them accessible for diverse residential and commercial applications.
At Starhouse, we define a wall mural as a curated, large-format visual design intended to integrate seamlessly with an interior wall, thereby altering the aesthetic and experiential quality of a space. It is a commitment to design that goes beyond surface decoration, aiming to create an environment. The range of options, from detailed photographic landscapes to abstract artistic expressions, ensures a mural can be tailored to virtually any design sensibility and functional requirement.
Murals typically arrive in multiple panels that are carefully aligned during installation to form a cohesive image. This modular approach allows for the creation of vast, unbroken scenes without the limitations of single-sheet printing. The precision of modern manufacturing ensures that these panels align perfectly, creating a seamless visual flow that is critical for the mural’s impact. The choice of substrate, such as non-woven fabric, vinyl, or traditional paper, dictates the installation method, durability, and textural finish of the final artwork.
The Enduring Appeal of Murals in Modern Design
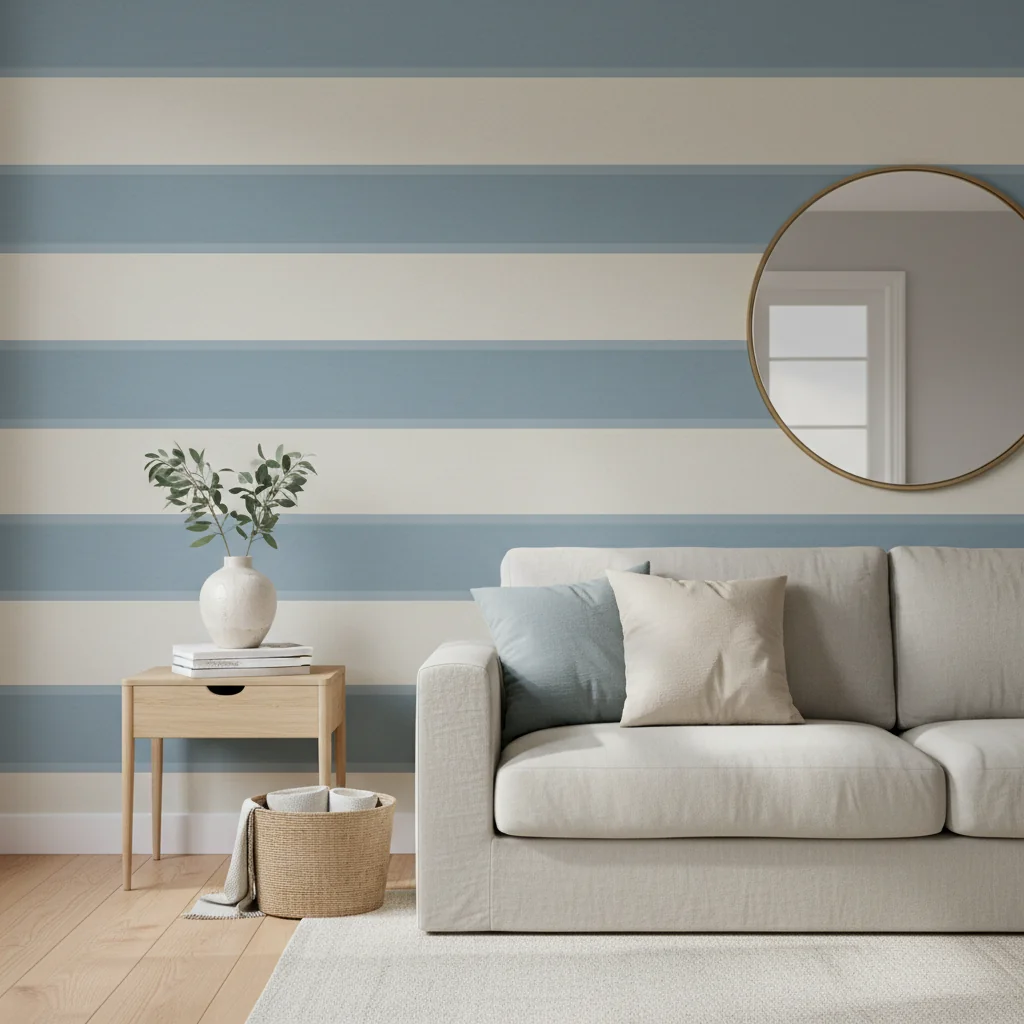
Murals possess an enduring appeal in modern design due to their unparalleled ability to transform a space, offering both a dramatic visual statement and a profound sense of personality that traditional wall coverings or art pieces cannot fully replicate. They serve as immersive design elements, capable of establishing a distinct mood, creating depth, or expanding the perceived boundaries of a room. This transformative power positions murals as a sophisticated choice for homeowners and designers seeking to elevate an interior beyond mere decoration.
The allure of murals lies in their capacity to personalize a space on a grand scale. Unlike mass-produced art, a thoughtfully chosen mural reflects individual taste and narrative, making a room feel uniquely tailored. From serene natural landscapes that evoke tranquility to bold abstract patterns that inject energy, murals allow for an expressive freedom that aligns perfectly with contemporary desires for bespoke interiors. They can define zones within open-plan living areas, create a focal point in a minimalist setting, or immerse occupants in a fantastical scene.
Moreover, modern advancements in printing technology and material science have made murals more accessible, durable, and versatile than ever before. The availability of peel-and-stick options has democratized mural installation, allowing for DIY projects with professional-grade results and the flexibility to update designs as tastes evolve. This combination of artistic impact, personalization, and practical accessibility cements murals as a cornerstone of sophisticated interior design, continually capturing the imagination of those looking to create truly memorable spaces.
For instance, a mural depicting a dense forest can bring biophilic design principles into an urban apartment, connecting occupants with nature and fostering a sense of calm. Conversely, a vibrant geometric mural can inject dynamic energy into a contemporary office or living room. The scale of a mural allows it to dominate a wall, eliminating the need for multiple smaller art pieces and creating a cleaner, more cohesive aesthetic. This singular focus can reduce visual clutter while maximizing artistic impact.
The ability of murals to influence spatial perception is another key aspect of their appeal. A mural with a receding perspective, such as a distant mountain range or an urban skyline, can make a small room feel significantly larger and more open. Conversely, a rich, dark floral pattern can create a cozy, intimate atmosphere in a larger space. This strategic manipulation of visual depth and scale is a sophisticated design tool that murals offer uniquely.
Furthermore, murals contribute to the overall tactile and visual texture of a room. Depending on the material—from smooth vinyl to subtly textured non-woven fabrics—they can add an additional layer of sensory experience. The matte or glossy finish of a mural also plays a role, reflecting light differently and contributing to the room’s ambient quality. This comprehensive engagement with the senses underscores the mural’s position as a powerful and enduring element in interior design.
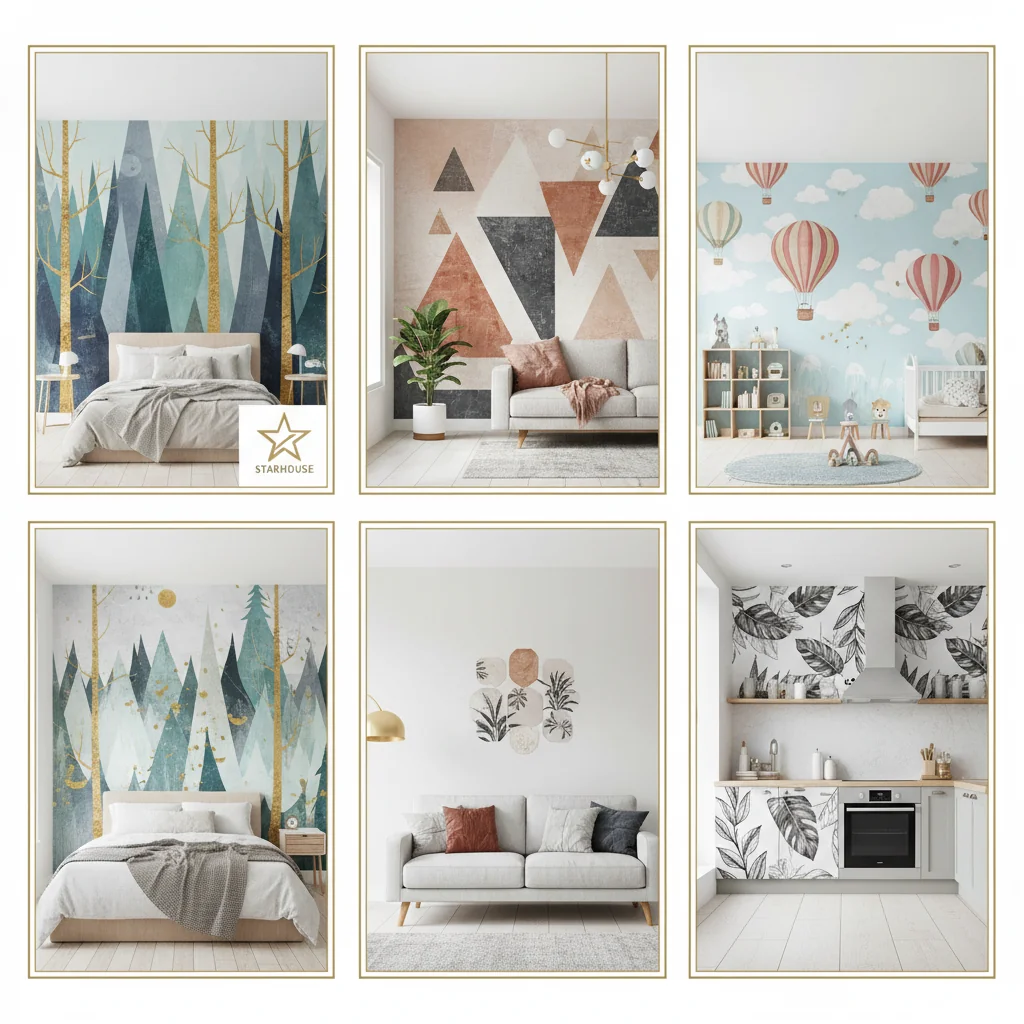
Exploring the Diverse Types of Wall Murals
The world of wall murals encompasses a broad spectrum of types, distinguished primarily by their material composition, installation method, and aesthetic presentation, each offering unique benefits and applications. Understanding these distinctions is crucial for selecting a mural that aligns with your design vision, practical requirements, and installation preferences. From temporary, DIY-friendly options to permanent, artisan-crafted works, the diversity ensures there is a mural type suitable for every space and need.
The evolution of mural technology has introduced innovative solutions that cater to various lifestyles and design goals. Whether you prioritize ease of installation, durability, specific textural qualities, or the timeless appeal of hand-painted art, a specific mural type is designed to meet those criteria. This section delineates the most prevalent types of wall murals available, providing a clear understanding of their characteristics.
Pre-Pasted Wallpaper Murals
Pre-pasted wallpaper murals feature a dry adhesive coating on the back that is activated by water, making them a moderately easy DIY option. These murals typically consist of paper-based or non-woven substrates, offering a smooth finish once installed. The water-activation process allows for some repositioning during installation, which is beneficial for aligning large panels perfectly.
- **Characteristics:** Water-activated adhesive, typically paper or non-woven base, allows for repositioning.
- **Ideal Use:** Bedrooms, living rooms, dining areas where a traditional wallpaper feel is desired without the mess of separate paste.
- **Durability:** Good, dependent on the substrate; generally resistant to minor scuffs but not highly washable.
- **Maintenance:** Wipe clean with a damp cloth; avoid harsh scrubbing.
Peel-and-Stick Murals
Peel-and-stick murals are characterized by their self-adhesive backing, protected by a removable liner, making them the most user-friendly and temporary mural option. These are typically made from vinyl or fabric-based materials, which are durable and often repositionable multiple times without damaging the wall surface or the mural itself. This type is ideal for renters, children’s rooms, or anyone seeking design flexibility.
- **Characteristics:** Self-adhesive, removable, and often repositionable; typically vinyl or fabric.
- **Ideal Use:** Apartments, temporary décor, children’s rooms, accent walls, and spaces requiring frequent design updates.
- **Durability:** Excellent, especially vinyl options which are often water-resistant and washable.
- **Maintenance:** Easy to clean with a damp cloth and mild detergent.
Non-Woven Murals (Paste-the-Wall)
Non-woven murals are crafted from a blend of natural and synthetic fibers, making them exceptionally durable, breathable, and dimensionally stable. The “paste-the-wall” installation method involves applying adhesive directly to the wall rather than the mural panels, simplifying the process and reducing mess. These murals do not expand or contract when wet, ensuring precise alignment and a seamless finish. They are also easily strippable when it’s time for a change.
- **Characteristics:** Breathable, durable, dimensionally stable; paste applied directly to the wall.
- **Ideal Use:** High-traffic areas, bathrooms (with proper ventilation), and any space where durability and easy removal are priorities.
- **Durability:** Very high, resistant to tearing and often washable.
- **Maintenance:** Can typically be wiped clean with a damp cloth and mild soap.
Traditional Paper-Based Murals
Traditional paper-based murals require the application of a separate wallpaper paste to the back of each panel before installation. While more involved than pre-pasted or peel-and-stick options, they offer a classic aesthetic and can be very cost-effective. These murals are typically less durable and more prone to tearing during installation compared to non-woven or vinyl types, but they provide a smooth, matte finish that can enhance intricate designs.
- **Characteristics:** Requires separate adhesive application; traditional paper substrate.
- **Ideal Use:** Formal living spaces, dining rooms, or areas where cost-effectiveness and a classic finish are desired.
- **Durability:** Moderate; susceptible to moisture and tearing; generally not washable.
- **Maintenance:** Dust lightly; avoid moisture and scrubbing.
Digital Print Murals
Digital print murals refer to the method of production rather than the material itself, as they can be printed on various substrates including vinyl, non-woven, or fabric. This category is defined by the use of high-resolution digital printing technology, allowing for virtually any image, photograph, or graphic design to be faithfully reproduced at a large scale with exceptional detail and color fidelity. Digital printing has revolutionized mural design, offering endless customization possibilities.
- **Characteristics:** High-resolution imagery, vast customization options, printed on various substrates.
- **Ideal Use:** Any space where a specific image or custom design is desired; highly versatile depending on the chosen substrate.
- **Durability:** Varies greatly by substrate (e.g., vinyl is highly durable, paper less so).
- **Maintenance:** Varies by substrate.
Hand-Painted Murals
Hand-painted murals are bespoke artworks created directly onto the wall surface by a skilled artist using paints such as acrylic, oil, or latex. These are the most permanent and labor-intensive type of mural, offering unparalleled artistic authenticity, texture, and depth. A hand-painted mural is a unique, one-of-a-kind piece that can be tailored precisely to the architectural features and aesthetic of a space, often becoming a significant investment and a focal point of a home. For example, the Kabotie Murals at Petrified Forest National Park exemplify the historical and artistic significance of hand-painted murals and the dedicated conservation efforts required to preserve them.
- **Characteristics:** Unique, bespoke, direct application by an artist; permanent.
- **Ideal Use:** High-end residential, custom artistic statements, historical preservation, or areas where a truly unique artwork is desired.
- **Durability:** Excellent, comparable to painted walls, but can be susceptible to fading over time if not properly sealed or exposed to direct sunlight.
- **Maintenance:** Gentle cleaning with a soft cloth; avoid abrasive cleaners.
Tile and Mosaic Murals
Tile and mosaic murals involve assembling small pieces of ceramic, glass, stone, or other materials to create a larger image or pattern on a wall. These murals are exceptionally durable, water-resistant, and ideal for wet environments like bathrooms, kitchens, or outdoor spaces. They offer a unique textural quality and a timeless aesthetic, though installation is labor-intensive and typically requires professional expertise.
- **Characteristics:** Durable, water-resistant, textural, long-lasting; made from individual tiles.
- **Ideal Use:** Bathrooms, kitchens, outdoor areas, backsplashes, and high-moisture environments.
- **Durability:** Extremely high, resistant to moisture, heat, and wear.
- **Maintenance:** Easy to clean with standard tile cleaners; grout may require periodic sealing.
Choosing the Right Material for Your Mural
Selecting the appropriate material for your wall mural is a foundational decision that impacts its aesthetics, durability, ease of installation, and long-term maintenance. Each material type offers distinct characteristics suited for different environments and design goals, from high-traffic commercial spaces to serene residential bedrooms. Understanding the properties of vinyl, non-woven, paper-based, fabric, ceramic, and painted options is essential for making an informed choice that ensures your mural performs optimally and retains its beauty over time.
The right material choice is not merely about visual appeal; it encompasses practical considerations such as resistance to moisture, lightfastness, ease of cleaning, and the ability to withstand everyday wear and tear. For instance, a mural destined for a child’s playroom will require different material properties than one intended for a formal dining room. This section provides a detailed overview of common mural materials, helping you match material characteristics to your specific needs.
Vinyl Materials
Vinyl is a highly popular choice for wall murals due to its exceptional durability, washability, and versatility. It is typically composed of a PVC (polyvinyl chloride) layer over a fabric or paper backing. Vinyl murals are resistant to moisture, scuffs, and fading, making them ideal for high-traffic areas, kitchens, and bathrooms. They are available in various finishes, from matte to glossy, and can replicate a range of textures. The thickness and quality of the vinyl can vary, influencing its longevity and ease of installation.
- **Pros:** Highly durable, moisture-resistant, washable, good for high-traffic areas, vibrant color reproduction.
- **Cons:** Less breathable than non-woven, can be heavier to install, some lower-quality vinyls may have a plastic sheen.
- **Cost:** Mid-range.
- **Ideal Use:** Commercial spaces, children’s rooms, kitchens, bathrooms, hallways.
Non-Woven Materials
Non-woven murals are celebrated for their breathability, environmental friendliness, and ease of installation and removal. Made from a blend of natural and synthetic fibers, these materials are dimensionally stable, meaning they do not expand or contract when paste is applied, leading to very precise panel alignment. They are also tear-resistant and often strippable dry, making them a favored choice for those who anticipate future design changes. Non-woven materials typically offer a soft, matte finish that absorbs light beautifully.
- **Pros:** Breathable, eco-friendly (often PVC-free), easy to install (paste-the-wall), easily strippable, dimensionally stable, durable.
- **Cons:** Generally less moisture-resistant than vinyl, can be more expensive than traditional paper.
- **Cost:** Mid to high-range.
- **Ideal Use:** Bedrooms, living rooms, dining rooms, nurseries; excellent for a sophisticated, matte look.
Paper-Based Materials
Traditional paper-based murals offer a classic aesthetic and are generally the most cost-effective option. They provide a smooth, matte surface that renders intricate details and subtle color variations beautifully. However, paper murals are less durable than vinyl or non-woven alternatives, being more susceptible to tearing during installation and less resistant to moisture and scrubbing. They typically require a separate wallpaper paste for application.
- **Pros:** Cost-effective, classic look, excellent for fine detail and rich colors, smooth finish.
- **Cons:** Less durable, prone to tearing, not washable, more challenging installation process (paste-the-paper).
- **Cost:** Low-range.
- **Ideal Use:** Formal living areas, low-traffic rooms, temporary installations where budget is a primary concern.
Fabric Materials
Fabric murals, often made from polyester or canvas, provide a unique textural quality and a luxurious, soft finish. They can add warmth and depth to a room, and some fabric options are designed for acoustic benefits, helping to dampen sound. Many fabric murals are peel-and-stick, offering ease of installation and repositionability. They are generally durable and can be gently cleaned, though they may not be as resistant to heavy scrubbing as vinyl.
- **Pros:** Unique texture, luxurious feel, good for acoustic dampening, often repositionable (peel-and-stick versions).
- **Cons:** Can be more expensive, may absorb stains more readily than vinyl, not suitable for high-moisture areas.
- **Cost:** High-range.
- **Ideal Use:** Bedrooms, media rooms, quiet living spaces, areas where tactile quality is important.
Ceramic and Tile Materials
Ceramic and tile murals are constructed from individual tiles that, when assembled, form a cohesive image or pattern. These materials are exceptionally durable, heat-resistant, and water-impermeable, making them ideal for bathrooms, kitchens, and outdoor applications. They offer a distinct visual texture and a permanent, artistic statement. Installation is labor-intensive and typically requires professional tiling expertise, including proper substrate preparation and grouting.
- **Pros:** Extremely durable, water-resistant, heat-resistant, long-lasting, unique textural aesthetic.
- **Cons:** High cost, complex and labor-intensive installation, not easily changed, grout lines are visible.
- **Cost:** Very high-range.
- **Ideal Use:** Bathrooms, kitchen backsplashes, outdoor areas, spas, commercial wet areas.
Acrylic and Oil Paint
For hand-painted murals, acrylic and oil paints are the primary mediums. Acrylics are water-based, dry quickly, and offer excellent color vibrancy and durability, making them suitable for a wide range of indoor applications. Oil paints, while slower drying, provide a rich, luminous quality and deep color saturation, often preferred for their traditional fine art aesthetic. Both offer the ultimate in customization and artistic expression, resulting in a truly unique, permanent artwork.
- **Pros:** Ultimate customization, unique artistic expression, permanent, rich texture and depth.
- **Cons:** Very high cost, long production time, permanent and not easily changed, requires professional artist.
- **Cost:** Custom pricing, typically very high.
- **Ideal Use:** High-end residential, custom artistic statements, historical reproductions, focal walls.
To further illustrate the differences, consider this comparative table:
| Material Type | Durability | Washability | Installation Difficulty | Approx. Price Range (per sq ft) | Ideal Use Cases |
|---|---|---|---|---|---|
| Vinyl | High (Resistant to scuffs, moisture) | High (Wipeable, often scrubbable) | Moderate (Peel-and-stick is easy, pasted vinyl is moderate) | $4 – $12 | High-traffic areas, kids’ rooms, kitchens, bathrooms |
| Non-Woven | High (Tear-resistant, dimensionally stable) | Moderate to High (Wipeable with damp cloth) | Easy (Paste-the-wall) | $5 – $15 | Living rooms, bedrooms, nurseries, sophisticated spaces |
| Paper-Based | Low to Moderate (Prone to tearing, moisture damage) | Low (Dust lightly, avoid moisture) | Moderate (Requires paste application, careful handling) | $2 – $8 | Formal dining rooms, low-traffic areas, budget-conscious projects |
| Fabric | Moderate to High (Soft, can be delicate) | Moderate (Gentle spot cleaning) | Easy to Moderate (Often peel-and-stick or fabric-backed) | $8 – $25 | Bedrooms, media rooms, acoustic applications, luxury interiors |
| Ceramic/Tile | Very High (Waterproof, heat-resistant, impact-resistant) | Very High (Scrubbable with appropriate cleaners) | Very High (Professional tiling required) | $20 – $100+ | Bathrooms, kitchens, backsplashes, outdoor areas |
| Acrylic/Oil Paint | High (Long-lasting, dependent on artist’s technique and sealant) | Moderate (Gentle cleaning, can be sealed) | Very High (Professional artist required) | Custom ($100 – $1000+ per sq ft) | Bespoke art installations, high-end residential, unique statements |
Sizing and Measuring for a Flawless Mural Installation
Accurate sizing and precise measurement are the most critical steps in ensuring a flawless wall mural installation, directly impacting the aesthetic outcome and preventing costly errors. Unlike standard wallpaper, murals are often designed as a single, large image, meaning even slight inaccuracies in measurement can lead to misaligned patterns, truncated designs, or unsightly gaps. This foundational stage requires meticulous attention to detail to guarantee that the mural fits its designated wall perfectly and presents its intended visual effect.
Relying on rough estimates or approximate dimensions invariably leads to complications during installation. A professional approach to measurement involves not only obtaining the primary height and width of the wall but also considering architectural nuances, potential irregularities, and necessary allowances for trimming. This section provides a comprehensive guide to accurately measuring your space for a wall mural, ensuring a seamless and professional result.
Accurate Wall Dimensions
The first step is to obtain the precise height and width of the wall where the mural will be installed. Measure the wall in several places, from floor to ceiling and from corner to corner. Walls are rarely perfectly square or plumb, so taking multiple measurements (e.g., height at left, center, and right; width at top, middle, and bottom) will reveal any discrepancies. Use the largest measurements obtained for both height and width to ensure adequate coverage. For example, if your wall measures 10 feet 3 inches at one point and 10 feet 4 inches at another, use 10 feet 4 inches as your base height.
- **Method:** Use a retractable metal tape measure for accuracy.
- **Best Practice:** Measure at least three points horizontally and three points vertically.
- **Recording:** Document all measurements clearly, noting the largest values for final order dimensions.
Accounting for Architectural Features
Windows, doors, built-in shelving, electrical outlets, and light switches are integral architectural features that must be precisely accounted for. While the mural will be installed over these elements, you will cut around them during installation. It is crucial to measure their exact positions and dimensions relative to the wall edges. This information helps visualize how the mural’s design will interact with these features and ensures no critical elements of the artwork are inadvertently obscured or cut off.
- **Windows/Doors:** Measure the exact height and width of the opening, and its distance from the floor, ceiling, and adjacent walls.
- **Outlets/Switches:** Note their height from the floor and distance from the nearest wall edge.
- **Built-ins:** Measure the dimensions and placement of any permanent fixtures.
- **Strategy:** Sketch a diagram of your wall, marking all features with their exact measurements.
Understanding Bleed and Overlap
It is standard practice to add a “bleed” or “buffer” to your final mural dimensions. This typically involves adding 2-4 inches to both the total height and total width of your wall measurements. This extra material provides a margin for error, compensating for walls that are not perfectly straight, slight measurement inaccuracies, or variations during installation. The excess material is trimmed away after the mural is installed, ensuring a perfect edge-to-edge fit. Most professional mural suppliers recommend a minimum of 2 inches of bleed on all sides.
Overlap refers to the slight excess material on each panel designed to be trimmed after alignment. For multi-panel murals, panels often come with a small overlap (e.g., 0.5 to 1 inch) to facilitate seamless pattern matching. This overlap is carefully trimmed during installation to create an invisible seam. Ensure you understand if your chosen mural includes an overlap or requires a butt-joint installation (where panels meet edge-to-edge without overlap).
- **Bleed:** Add 2-4 inches to both total height and width measurements before ordering.
- **Overlap:** Confirm with your supplier if panels come with an overlap for trimming or are designed for butt-joining.
Considering Pattern Repeat
While many murals are single, continuous images, some designs incorporate a repeating pattern across panels. If your mural has a pattern repeat, understanding it is crucial for proper alignment and minimizing waste. Ensure that when you calculate the number of panels needed, you account for the pattern repeat to maintain visual continuity. Most mural providers will factor this into their paneling, but it is good to be aware, especially for custom designs.
- **Continuous Image:** Most murals are a single image; focus on precise height/width.
- **Repeating Pattern:** Ensure panels align vertically and horizontally to maintain the pattern.
When to Engage Professional Measurement
For complex spaces, walls with significant irregularities, or if you feel uncertain about your measuring skills, engaging a professional for measurement is a prudent investment. Professional installers have specialized tools and experience in identifying potential challenges, such as uneven walls, corners that are not 90 degrees, or difficult-to-access areas. Their expertise ensures the measurements are precise, reducing the likelihood of errors and guaranteeing a smoother installation process. This is particularly recommended for high-value custom murals or installations in historic homes.
- **Indicators:** Uneven walls, unusual architectural features, high ceilings, or lack of DIY confidence.
- **Benefits:** Precision, identification of potential issues, reduced risk of errors.
By meticulously following these measurement guidelines, you establish the foundation for a stunning and perfectly fitted mural that will enhance your space for years to come. Precision at this stage is an investment in the overall success and aesthetic integrity of your mural project.
Starhouse is curating its collection to bring you the finest in home décor. We invite you to share your vision and tell us what you’re looking for in wall murals and other home furnishings. Your input helps us tailor our offerings and grants you early access to our exclusive launch.
Installation Techniques: From DIY to Professional
The successful installation of a wall mural is as crucial as its selection, directly influencing its final appearance and longevity. While some mural types are designed for straightforward DIY application, others demand professional expertise and specialized tools for optimal results. Understanding the specific installation techniques associated with each mural material—from peel-and-stick convenience to traditional pasting methods—empowers you to choose the right approach for your project, ensuring a smooth, seamless, and durable finish. Proper preparation and adherence to manufacturer guidelines are universally essential, regardless of the chosen method.
Each installation technique has its own set of requirements, tools, and best practices. Incorrect installation can lead to bubbling, peeling, visible seams, or damage to the mural and the wall. This section outlines the primary installation methods, providing a clear roadmap for achieving a professional-grade mural application, whether you opt for a DIY approach or enlist the help of an expert.
Essential Surface Preparation
Regardless of the mural type or installation method, thorough surface preparation is paramount. The wall must be clean, dry, smooth, and free of any dust, grease, or loose paint. Fill any holes or cracks with spackle, sand them smooth, and wipe clean. For optimal adhesion, especially with traditional or non-woven murals, applying a high-quality primer is often recommended. A consistent, light-colored base coat ensures the mural’s colors appear true and prevents any underlying wall colors from showing through.
If your home was built before 1978, it is critical to test for lead paint before any surface preparation that might disturb existing paint. The EPA Lead Paint Safety Rules specify precautions and certifications for working with lead-based paint, which can be hazardous if disturbed. For any painting or coating application, including mural installation, general safety practices are important. The OSHA standard 1915.35 on Painting, while specific to shipyards, underscores the importance of proper ventilation, personal protective equipment, and safe handling of materials, principles that apply broadly to any significant coating project to ensure worker safety and proper application.
- **Cleanliness:** Wash walls with a mild detergent solution, rinse thoroughly, and allow to dry completely.
- **Smoothness:** Repair imperfections, sand rough spots, and remove old wallpaper residue.
- **Priming:** Apply a good quality primer, especially on new drywall, porous surfaces, or if changing wall color significantly.
- **Safety:** Ensure proper ventilation and wear appropriate personal protective equipment, especially when dealing with older paint or strong adhesives.
Peel-and-Stick Installation
Peel-and-stick murals are designed for the easiest DIY installation. They feature an adhesive backing protected by a release liner. The process typically involves peeling back a small portion of the liner, aligning the panel at the top of the wall, and slowly pressing it onto the surface while progressively removing the liner. A smoothing tool (squeegee) is used to eliminate air bubbles and ensure firm adhesion. These murals are often repositionable, allowing for adjustments during installation.
- **Tools:** Smoothing tool (squeegee), utility knife, straight edge, tape measure, pencil.
- **Process:** Start from the top, peel a few inches of backing, align, press, and slowly peel/smooth downwards.
- **Benefits:** Easy to reposition, no mess from paste, removable without damaging walls, ideal for temporary use.
Pre-Pasted (Water-Activated) Installation
Pre-pasted murals have a dry adhesive on their backing that is activated by water. The panels are typically “booked” (folded adhesive-to-adhesive) after wetting to allow the adhesive to activate fully, a process known as “relaxing.” This allows the material to expand before application, preventing bubbling or shrinking on the wall. Panels are then applied to the wall, smoothed with a brush or squeegee, and excess trimmed.
- **Tools:** Water tray, smoothing brush/squeegee, utility knife, straight edge, tape measure, sponge, bucket.
- **Process:** Wet backing, book panels, wait for activation, apply to wall, smooth out air bubbles and excess paste.
- **Benefits:** Cleaner than traditional paste, allows for repositioning while wet, good adhesion.
Paste-the-Wall (Non-Woven) Installation
Non-woven murals utilize the paste-the-wall method, which involves applying wallpaper paste directly to the wall surface rather than the mural panels. This technique simplifies installation by making panels lighter and easier to handle, and eliminates the need for booking. Non-woven materials are dimensionally stable, meaning they won’t stretch or shrink, resulting in precise seam alignment. Excess paste is easily wiped away.
- **Tools:** Wallpaper paste, roller/brush for paste, smoothing tool/brush, utility knife, straight edge, tape measure, sponge, bucket.
- **Process:** Apply paste to a section of the wall, hang dry panel, smooth, repeat for subsequent panels.
- **Benefits:** Less messy, panels are easier to handle, excellent for seamless results, often dry-strippable.
Traditional Paste-the-Paper Installation
Traditional paper-based murals require a separate wallpaper paste to be applied evenly to the back of each panel. Like pre-pasted murals, these panels are typically booked to allow the paste to fully saturate the paper and for the material to relax before application. This method is more labor-intensive and requires careful handling to prevent tearing, but it provides a classic, permanent finish. This technique is often used for heavier, more intricate paper-based designs.
- **Tools:** Wallpaper paste, paste brush/roller, pasting table, smoothing brush, utility knife, straight edge, tape measure, sponge, bucket.
- **Process:** Apply paste to panel, book panel, allow to relax, hang on wall, smooth, trim.
- **Benefits:** Strong, permanent bond; classic aesthetic.
Hiring a Professional Installer
For large-scale murals, intricate designs, delicate materials, or if you simply prefer expert results, hiring a professional wallpaper or mural installer is highly recommended. Professionals possess the specialized tools, experience, and techniques to handle complex installations, ensuring perfect alignment, seamless finishes, and proper adhesion. They can also address unexpected wall irregularities and provide guarantees on their work. This investment ensures your mural looks its absolute best and lasts for years, especially for high-value or permanent installations.
- **When to Hire:** Complex designs, large walls, delicate materials, desire for guaranteed flawless results, lack of DIY experience.
- **Benefits:** Expertise, specialized tools, efficiency, problem-solving skills, warranty on installation.
Regardless of the method chosen, always read and follow the specific installation instructions provided by the mural manufacturer. These instructions are tailored to the unique properties of the material and adhesive, ensuring the best possible outcome for your wall mural.
Caring for Your Wall Mural: Maintenance and Longevity
Proper care and maintenance are essential for preserving the vibrancy, integrity, and longevity of your wall mural, ensuring it remains a stunning focal point in your home for years to come. The specific cleaning and care routine will largely depend on the mural’s material, as vinyl, non-woven, paper, and hand-painted surfaces each have distinct requirements. Adhering to the manufacturer’s guidelines for your specific mural is crucial to prevent damage, fading, or deterioration. A proactive approach to cleaning and protection will safeguard your investment and maintain its aesthetic appeal.
Neglecting proper care can lead to premature wear, discoloration, or irreparable damage, diminishing the mural’s impact. This section provides comprehensive guidance on routine cleaning, stain removal, damage prevention, and minor repairs, tailored to the different types of mural materials. By implementing these practices, you can ensure your mural continues to inspire and beautify your space.
Routine Cleaning and Dusting
Regular, gentle cleaning is the first line of defense against dust and grime accumulation. For most mural types, a soft, dry microfiber cloth or a feather duster is sufficient for routine dusting. Avoid abrasive tools or harsh scrubbing, which can scratch or dull the surface, especially on matte or delicate finishes.
- **Vinyl and Non-Woven:** These materials are generally quite durable. Dust regularly. For light marks or smudges, a slightly damp, soft cloth with a very mild, non-abrasive soap (like diluted dish soap) can be used. Wipe gently and then follow with a clean, damp cloth to remove any soap residue.
- **Paper-Based Murals:** These are typically not washable. Dust only with a soft, dry cloth or feather duster. Avoid any moisture, as it can cause warping, staining, or damage to the paper and ink.
- **Fabric Murals:** Use a soft brush attachment on a vacuum cleaner for dusting. Spot clean with extreme caution, as moisture can leave watermarks. Consult manufacturer instructions specifically.
- **Hand-Painted Murals:** Dust with a soft, dry cloth. If sealed, some gentle wiping might be possible, but always test in an inconspicuous area first. Avoid any chemicals.
- **Tile and Mosaic Murals:** Can be cleaned with standard tile and grout cleaners. Ensure grout is sealed periodically to prevent staining.
Spot Treatment for Stains
Address spills and stains immediately to prevent them from setting. The method of spot treatment depends heavily on the mural material:
- **Vinyl and Non-Woven:** For most common household stains (e.g., food, beverages), a clean cloth dampened with warm water and a small amount of mild, pH-neutral soap is effective. Blot the stain gently; do not rub vigorously. Rinse with a clean, damp cloth. Avoid harsh chemical cleaners, bleach, or abrasive pads, as these can damage the print or finish.
- **Paper-Based Murals:** Stains are very difficult to remove from paper murals without causing damage. Professional cleaning might be an option for valuable pieces, but generally, immediate blotting with a dry cloth is the only safe first step.
- **Fabric Murals:** Follow specific manufacturer guidelines, often involving gentle blotting with a clean, dry cloth or a specialized fabric cleaner. Test any cleaning solution in a hidden area first.
- **Hand-Painted Murals:** For minor marks, a very light touch with a soft, slightly damp cloth might work if the mural is sealed. For anything significant, consult the artist or a professional art conservator.
Preventing Damage and Fading
Proactive measures are crucial for extending your mural’s life:
- **UV Protection:** Direct and prolonged exposure to sunlight can cause colors to fade over time, especially with digitally printed murals. Consider installing UV-protective window films or using curtains/blinds to shield the mural during peak sunlight hours.
- **Humidity Control:** Extreme fluctuations in humidity can affect the adhesion and material integrity of some murals, leading to peeling or warping. Maintain a consistent indoor humidity level, ideally between 30-50%, using humidifiers or dehumidifiers as needed.
- **Physical Damage:** Protect murals in high-traffic areas from scuffs, scratches, and impacts. Furniture placement should allow for adequate clearance.
- **Heat Sources:** Keep murals away from direct heat sources like radiators, fireplaces, or heating vents, which can cause drying, cracking, or peeling.
- **Chemical Exposure:** Avoid spraying household cleaners, air fresheners, or other chemicals directly onto or near the mural, as residues can cause discoloration or damage.
Addressing Minor Damage
Small issues can often be addressed to prevent them from worsening:
- **Bubbles:** For peel-and-stick or paste-the-wall murals, small air bubbles can often be gently smoothed out with a squeegee or a soft cloth. For stubborn bubbles, a tiny pinprick and subsequent smoothing can release trapped air.
- **Peeling Edges:** If edges start to peel, especially with traditional or pre-pasted murals, a small amount of wallpaper adhesive can be carefully applied with a fine brush underneath the lifted edge, then pressed firmly back into place.
- **Small Tears/Creases:** For minor tears in paper or non-woven murals, a very thin layer of clear wallpaper adhesive can be applied to the back of the torn piece and carefully pressed back. For significant damage, professional repair or panel replacement might be necessary.
Always refer to the specific care instructions provided by Starhouse or the mural manufacturer. When in doubt, or for significant damage, consulting a professional wallpaper hanger or art conservator is the most prudent course of action to ensure the best possible outcome for your cherished mural.
Integrating Murals into Your Home’s Aesthetic: Styling and Pairing
Integrating a wall mural seamlessly into your home’s aesthetic transcends mere installation; it requires thoughtful styling and careful pairing with existing furnishings, textiles, and lighting to create a cohesive and impactful design narrative. A well-chosen mural can serve as the cornerstone of a room’s design, defining its character and influencing its mood. The objective is to ensure the mural enhances, rather than overwhelms, the space, contributing to a balanced and sophisticated interior. This involves considering color palettes, furniture scale, and the overall functional purpose of the room.
The art of styling a mural lies in harmonizing its visual presence with the surrounding elements, transforming a wall into an immersive experience. From accentuating existing décor to establishing a completely new design direction, strategic integration ensures your mural feels like an organic extension of your home. This section provides expert guidance on how to effectively style and pair your mural for maximum aesthetic impact and functional harmony.
Mural as a Focal Point
A wall mural inherently draws attention, making it an ideal choice for creating a dominant focal point in any room. When a mural is intended to be the central visual element, simplify surrounding décor to avoid competition. Choose a mural with a strong visual presence, whether through vibrant colors, intricate details, or a commanding subject matter. Position key furniture pieces, such as a sofa in a living room or a bed in a bedroom, to face or be centered against the mural wall to maximize its impact.
- **Strategy:** Select a bold, captivating mural.
- **Execution:** Keep other walls and décor understated. Arrange primary furniture to highlight the mural.
- **Impact:** Creates immediate visual interest and sets the tone for the entire room.
Defining Zones and Enhancing Space
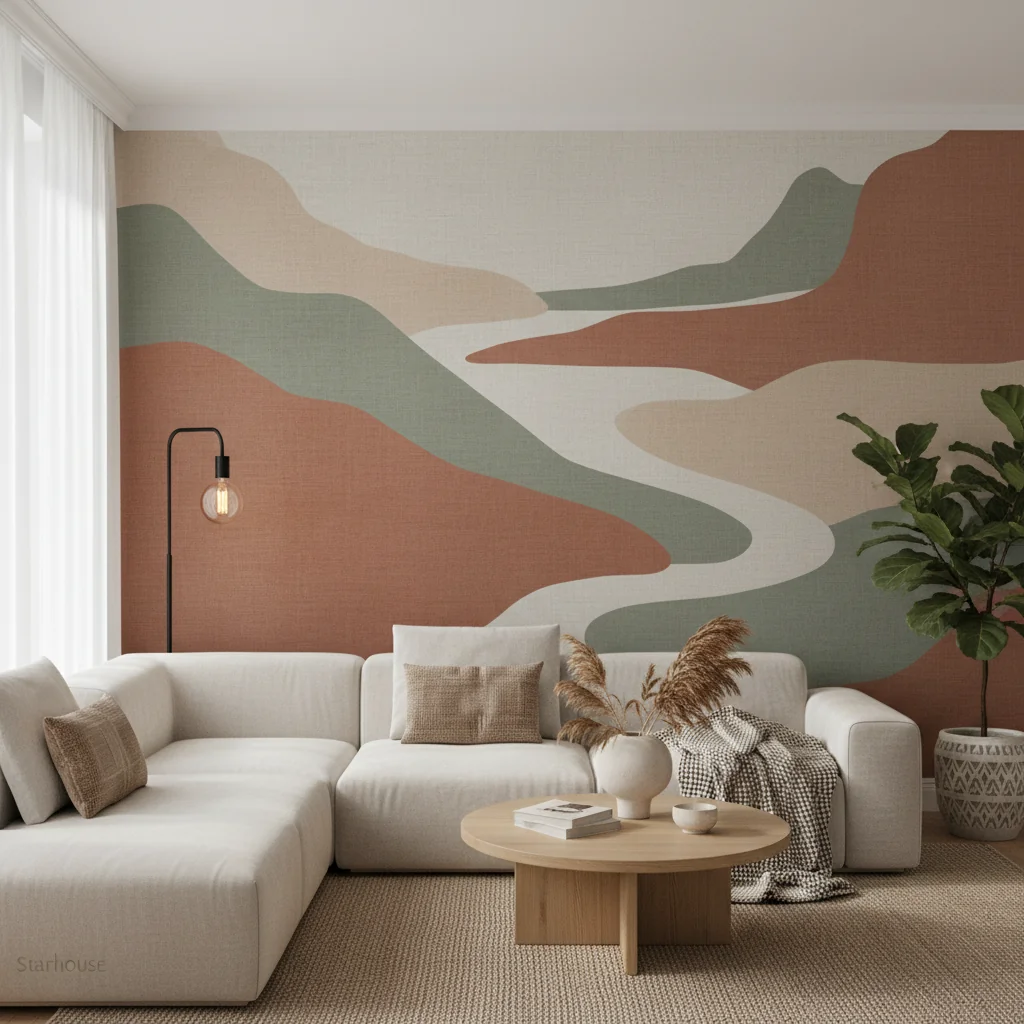
Murals can be strategically used to define functional zones within open-plan living areas or to alter the perceived size of a room. A mural in a dining nook can visually separate it from a contiguous living space, while a scenic landscape with receding perspective can make a smaller room feel more expansive. Consider the mural’s imagery and depth to manipulate spatial perception effectively. For instance, a light-colored, expansive sky mural can elevate a low ceiling, while a dark, rich botanical can create intimacy in a large, airy room.
- **Zone Definition:** Use a mural to delineate a specific area (e.g., reading corner, home office section).
- **Space Enhancement:** Employ perspective and light/dark colors to make rooms feel larger or cozier.
- **Effect:** Adds structure to open layouts and influences psychological perception of space.
Coordinating with Furniture and Décor
The success of a mural’s integration relies heavily on its coordination with existing furniture, textiles, and decorative accessories.
- **Color Palette:** Extract dominant or accent colors from the mural and echo them in throw pillows, rugs, curtains, or small decorative objects. This creates a cohesive color story. Avoid matching too precisely; subtle echoes are more sophisticated.
- **Style Alignment:** Ensure the mural’s style (e.g., abstract, botanical, vintage) complements the furniture. A sleek, modern mural pairs well with minimalist furniture, while a traditional landscape might require classic pieces.
- **Scale and Proportion:** Be mindful of furniture scale relative to the mural. Large-scale murals can dwarf small furniture, while a busy mural might compete with intricate furniture details. Aim for balance.
- **Textiles:** Introduce textures through fabrics that complement the mural. A soft, flowing floral mural might be paired with linen or silk, while a rugged landscape could be balanced with wool or leather.
The Impact of Lighting
Lighting plays a pivotal role in how a mural is perceived, affecting its colors, depth, and overall mood.
- **Natural Light:** Assess how natural light hits the mural throughout the day. Bright, direct sunlight can wash out colors or cause glare, while indirect light can soften the image.
- **Artificial Lighting:** Install adjustable track lighting or picture lights to illuminate the mural effectively, enhancing its details and colors. Warm lighting can create a cozy atmosphere, while cooler tones can make a space feel more modern.
- **Shadows:** Consider how light sources cast shadows on the mural, which can add depth or inadvertently obscure parts of the design.
Room-Specific Applications
Tailor the mural’s theme and style to the function and ambiance of each room:
- **Living Room:** A grand landscape or abstract art mural can serve as a sophisticated backdrop for entertaining or relaxing.
- **Bedroom:** Opt for serene, calming themes like soft botanicals, tranquil skies, or subtle abstract patterns to promote rest and relaxation.
- **Bathroom:** Choose water-resistant materials (like vinyl or tile) and themes that evoke spa-like tranquility or vibrant nature. Ensure proper ventilation to prevent moisture damage.
- **Kitchen:** Durable, washable materials are crucial. Consider food-related themes, urban cafe scenes, or geometric patterns that add energy. The US EPA’s regulations on Volatile Organic Compounds (VOCs) in Architectural Coatings are relevant here, as low-VOC murals and adhesives contribute to better indoor air quality, particularly important in areas like kitchens where air quality can be impacted by cooking and cleaning.
- **Home Office:** Murals can inspire creativity (abstract art), provide a sense of calm (nature scenes), or create a professional backdrop for video calls (subtle patterns).
- **Children’s Room/Nursery:** Engage imagination with whimsical, colorful themes featuring animals, fairy tales, or educational elements. Choose durable, easily cleanable materials.
By thoughtfully considering these styling and pairing principles, your wall mural will transcend its role as mere decoration, becoming an integral and harmonious element within your meticulously curated home. It will reflect your unique style and enhance the overall experience of your living environment.
Current Trends in Mural Design
The world of interior design is in constant evolution, and wall murals are no exception, continuously adapting to reflect contemporary aesthetics, technological advancements, and shifting lifestyle preferences. Staying attuned to current trends allows homeowners and designers to select murals that feel fresh, relevant, and aligned with modern design sensibilities. While timeless designs always hold their value, incorporating trending elements can infuse a space with a sense of currency and sophisticated style. These trends often emphasize connection to nature, artistic expression, and personalized environments.
From the resurgence of biophilic motifs to sophisticated abstract compositions, current mural trends prioritize creating immersive and meaningful spaces. This section highlights the most compelling and influential trends shaping mural design today, offering inspiration for those looking to update their interiors with a contemporary edge.
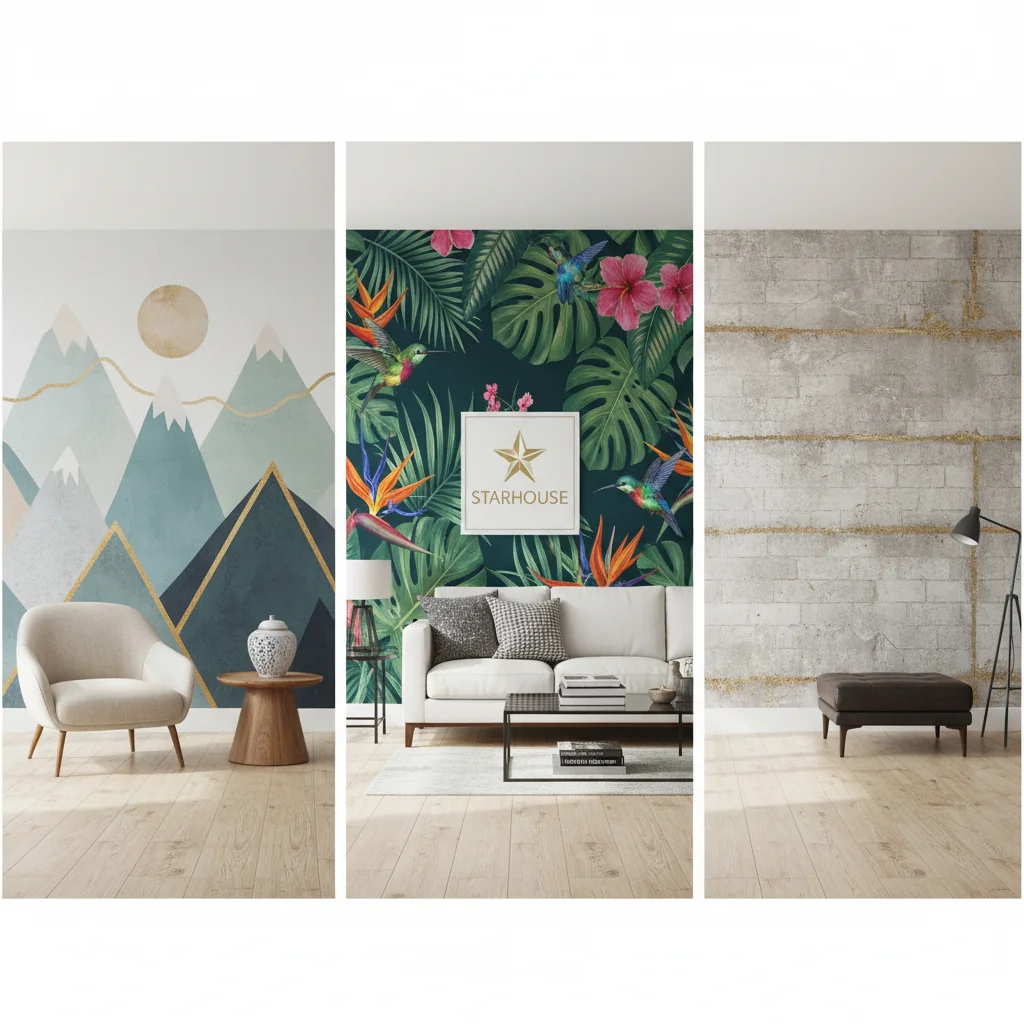
Biophilic Design and Nature-Inspired Art
Biophilic design, which emphasizes connecting humans with nature within built environments, remains a dominant and growing trend. Murals featuring lush botanicals, expansive forest scenes, serene seascapes, or delicate floral patterns are highly sought after. These designs often incorporate natural textures and organic forms, fostering a sense of calm, well-being, and a connection to the outdoors. Large-scale, immersive nature scenes are particularly popular, transforming entire walls into tranquil escapes.
- **Key Elements:** Dense forests, tropical foliage, mountain ranges, ocean views, abstract natural patterns, large-scale florals.
- **Impact:** Creates a calming, rejuvenating atmosphere; enhances mental well-being; blurs the lines between indoor and outdoor spaces.
- **Applications:** Bedrooms, bathrooms, living rooms, home offices.
Abstract and Geometric Minimalism
Abstract and geometric murals continue to appeal to those seeking a modern, sophisticated aesthetic. Current trends lean towards subtle, refined geometric patterns, often in muted or monochromatic color palettes, creating visual interest without overwhelming the space. Abstract designs feature soft gradients, fluid lines, and organic shapes that evoke a sense of movement and artistic expression. These murals serve as understated yet impactful backdrops, complementing minimalist furniture and clean architectural lines.
- **Key Elements:** Soft gradients, fluid lines, organic shapes, minimalist geometric patterns, monochromatic palettes, subtle textures.
- **Impact:** Adds contemporary sophistication, visual depth, and artistic flair without literal imagery.
- **Applications:** Modern living rooms, entryways, home offices, commercial spaces.
Large-Scale Florals and Botanicals
Building on the biophilic trend, large-scale floral and botanical murals are having a significant moment. These designs feature oversized blooms, sprawling leaves, and intricate floral arrangements, often rendered in rich, dramatic colors or delicate, watercolor-inspired washes. They create a dramatic, romantic, or whimsical statement, transforming a wall into a vibrant garden or a serene botanical study. These can range from realistic photographic interpretations to stylized, illustrative artwork.
- **Key Elements:** Oversized flowers, intricate leaves, dark and moody botanicals, vibrant floral compositions, watercolor effects.
- **Impact:** Creates a dramatic focal point, adds romance and femininity, brings life and color to a space.
- **Applications:** Bedrooms, dining rooms, powder rooms, accent walls.
Textural Effects and Faux Finishes
Murals that mimic the look and feel of natural textures, such as concrete, marble, weathered wood, exposed brick, or plaster, are gaining popularity. These designs add depth and tactile interest to walls, creating an industrial, rustic, or luxurious ambiance without the expense or structural changes of actual materials. Advanced digital printing allows for incredibly realistic reproductions of these textures, offering a sophisticated trompe l’oeil effect. Subtle textile patterns and woven looks are also trending, adding softness and warmth.
- **Key Elements:** Faux concrete, marble veins, distressed wood, exposed brick, plaster effects, woven patterns, subtle textile textures.
- **Impact:** Adds depth, character, and a sense of materiality; can create industrial, rustic, or luxurious aesthetics.
- **Applications:** Loft apartments, modern farmhouses, industrial-chic spaces, feature walls.
Vintage-Inspired and Archival Art
A renewed appreciation for history and nostalgia is driving the trend for vintage-inspired murals and designs drawn from archival art. This includes anything from intricate Art Deco patterns and Mid-Century Modern graphics to classical landscape paintings, old-world maps, or historical illustrations. These murals infuse a space with character, storytelling, and a sense of timeless elegance, often featuring muted color palettes or sepia tones to enhance their aged aesthetic.
- **Key Elements:** Art Deco geometry, Mid-Century Modern motifs, classical paintings, historical maps, antique botanical prints, vintage advertisements.
- **Impact:** Adds character, historical depth, a sense of nostalgia, and unique personality.
- **Applications:** Studies, libraries, formal living rooms, eclectic interiors, themed restaurants or bars.
These trends highlight a move towards more personalized, expressive, and nature-connected interiors. When selecting a mural, consider how these trends align with your personal style and the overall vision for your home, ensuring your choice remains both fashionable and enduring.
Common Mistakes to Avoid When Selecting and Installing a Mural
While wall murals offer an incredible opportunity to personalize and transform a space, several common pitfalls can compromise their visual impact and longevity. Avoiding these mistakes, from initial selection to final installation, is crucial for achieving a professional, satisfying, and enduring result. Many errors stem from inadequate planning, insufficient preparation, or underestimating the complexities involved, even with seemingly simple peel-and-stick options. Recognizing and preventing these missteps will save time, effort, and potential disappointment.
A successful mural project relies on meticulous attention to detail at every stage. This section outlines the most frequent mistakes made during the mural process, providing clear guidance on how to circumvent them and ensure your investment enhances your home beautifully.
Incorrect Measurements
The most frequent and costly mistake is inaccurate measurement. Ordering a mural that is too small will result in gaps, while one that is too large can lead to critical parts of the design being cut off or an awkward fit. Walls are rarely perfectly square, so relying on a single measurement for height and width is insufficient. This oversight can render an expensive custom mural unusable or significantly compromise its intended design.
- **Correction:** Measure the wall in multiple places (at least three points for height and width) and use the largest dimensions. Always add a 2-4 inch bleed to both height and width to account for uneven walls and provide trim allowance.
Ignoring Room Scale and Proportion
Selecting a mural that is disproportionate to the room’s size or the wall’s dimensions can overwhelm a small space or get lost in a large one. A mural with overly large motifs in a tiny room can feel claustrophobic, while a delicate, intricate pattern on a vast wall might lack impact. The scale of the design should harmonize with the room’s overall dimensions and the size of the wall it adorns.
- **Correction:** Consider the room’s dimensions and ceiling height. For smaller rooms, opt for designs with depth (e.g., receding landscapes) or subtle patterns. For large rooms, bold, expansive designs work well.
Poor Surface Preparation
An improperly prepared wall is a leading cause of mural failure, leading to bubbles, peeling, or visible imperfections. Dust, dirt, grease, old wallpaper residue, or uneven surfaces will prevent the mural from adhering correctly and can show through thinner materials. Painting over dark colors without priming can also affect the mural’s true color representation.
- **Correction:** Ensure the wall is clean, dry, smooth, and free of imperfections. Fill holes, sand rough spots, and prime the wall (especially if it’s new drywall, porous, or has a dark existing color) with a high-quality primer.
Choosing an Overly Trendy or Unsustainable Theme
While trends are inspiring, selecting a mural based solely on fleeting fads can lead to a quickly dated aesthetic and buyer’s remorse. A mural is a significant design commitment, and an overly specific or niche theme might not withstand the test of time or your evolving tastes. This can result in the need for premature replacement, which is both costly and labor-intensive.
- **Correction:** Balance current trends with timeless appeal. Choose themes that resonate deeply with your personal style rather than just what’s popular. Consider versatility and how the mural will complement future décor changes.
Rushing the Installation Process
Impatience during installation often leads to misaligned panels, bubbles, creases, or damage to the mural material. Each step, from surface preparation to final trimming, requires careful attention and a steady hand. Rushing can result in visible seams, distorted patterns, or a less-than-professional finish that detracts from the mural’s beauty.
- **Correction:** Allocate ample time for installation. Read all instructions thoroughly before starting. Work slowly and methodically, ensuring each panel is perfectly aligned and smoothed before moving to the next. Consider hiring a professional for complex installations.
Neglecting Lighting Considerations
The way a mural is lit can dramatically alter its appearance. Poor lighting can cast shadows, wash out colors, or create glare, diminishing the mural’s intended effect. Ignoring how natural and artificial light interacts with the mural can undermine even the most beautiful design.
- **Correction:** Assess natural light patterns throughout the day. Plan for appropriate artificial lighting, such as track lighting or picture lights, to highlight the mural without creating glare. Consider the mural’s finish (matte vs. glossy) and how it reflects light.
By being mindful of these common mistakes, you can approach your mural project with confidence and achieve a stunning, long-lasting enhancement to your home’s interior.
Sources
- 1915.35 – Painting. | Occupational Safety and Health Administration | osha.gov
- Architectural Coatings: National Volatile Organic Compounds Emission Standards | US EPA | epa.gov
- EPA Lead Paint Safety Rules | Benjamin Moore | benjaminmoore.com
- Kabotie Murals are Conserved – Petrified Forest National Park (U.S. National Park Service) | nps.gov
Frequently Asked Questions
What is the main difference between a mural and wallpaper?
The main difference is that a mural typically features a single, continuous image or design across multiple panels, creating a cohesive large-scale artwork, whereas wallpaper usually consists of repeating patterns designed to cover an entire room with a consistent motif.
Are wall murals difficult to install for a DIY enthusiast?
The difficulty of installing a wall mural varies significantly by type; peel-and-stick murals are generally considered the easiest for DIY enthusiasts due to their self-adhesive backing and repositionability, while traditional paste-the-paper murals require more skill and precision.
Can murals be removed without damaging the wall?
Yes, many modern mural types, particularly peel-and-stick and non-woven (paste-the-wall) materials, are designed for clean removal without damaging properly prepared walls. Traditional paper murals, however, typically require more effort and may leave residue or necessitate minor wall repairs.
How do I clean and maintain my wall mural?
Cleaning and maintenance depend on the mural’s material: vinyl and non-woven murals can usually be gently wiped with a damp cloth and mild soap, while paper-based murals require dry dusting only. Always refer to the manufacturer’s specific care instructions for optimal longevity.
What is the best material for a mural in a high-moisture area like a bathroom?
For high-moisture areas like bathrooms, vinyl or ceramic/tile materials are best due to their superior water resistance and durability. Non-woven murals can also be suitable if the bathroom is well-ventilated, but paper-based options are not recommended.
Do I need to prime my wall before installing a mural?
Yes, priming the wall is highly recommended for most mural installations, especially on new drywall, porous surfaces, or walls with existing dark paint. Primer ensures better adhesion, prevents underlying colors from showing through, and facilitates easier removal in the future.
How do I ensure the mural design aligns perfectly across multiple panels?
To ensure perfect alignment, meticulously measure your wall, account for bleed, and follow the manufacturer’s hanging instructions for overlap or butt-joint application. Starting with a plumb line and working slowly, smoothing each panel from the center outwards, is crucial for seamless results.
Conclusion
Wall murals represent a pinnacle of interior design, offering an unparalleled opportunity to infuse your home with personality, depth, and artistic flair. From the serene tranquility of a panoramic landscape to the dynamic energy of an abstract composition, the right mural can profoundly transform a space, making it uniquely yours. We have explored the diverse types, materials, and styles, provided precise guidance on measurement and installation, and outlined essential care practices to ensure your mural remains a source of beauty and inspiration for years to come. The journey from conception to a stunning installed mural is one of careful consideration and meticulous execution, rewarding you with an environment that truly reflects your aesthetic vision.
At Starhouse, we are dedicated to curating a collection that embodies sophisticated design and exceptional quality, empowering you to create spaces that resonate with your individual style. We believe that every home tells a story, and a thoughtfully chosen mural can be its most captivating chapter. As we prepare to launch our curated selection of wall décor and furnishings, we invite you to be a part of our journey. Share your design aspirations and tell us what you’re looking for in your dream home. Your insights will help us tailor our offerings, and in return, you’ll gain exclusive early access to our collection, ensuring you’re among the first to discover the perfect elements to complete your Starhouse.