A wall mural is a large-format image or design applied directly to a wall, transforming an ordinary surface into a captivating focal point or an immersive environmental experience. Unlike traditional repeating wallpaper patterns, murals typically feature a single, expansive image or a custom artistic composition that creates a continuous scene across the entire wall, often printed on durable substrates like vinyl or fabric for residential and commercial applications. Starhouse curates a refined collection of wall murals, offering discerning homeowners and designers the opportunity to infuse their spaces with unparalleled artistic expression and sophisticated design. This definitive guide explores every facet of wall murals, from their diverse types and materials to precise measurement, installation, and expert styling, ensuring you can confidently select and integrate a mural that elevates your home’s aesthetic.
Key takeaways
- Wall murals are large-format, continuous images or designs that create a singular artistic statement across a wall, distinctly different from repeating wallpaper patterns.
- Choosing the right mural involves considering the room’s function, existing decor, desired ambiance, and the specific type and material of the mural, such as photographic, illustrative, or abstract designs on vinyl or non-woven fabric.
- Accurate measurement is critical for mural installation, requiring precise dimensions of the wall and accounting for features like doors, windows, and architectural irregularities.
- Modern wall murals offer diverse application methods, including peel-and-stick for DIY ease and paste-the-wall options for a more traditional, durable finish.
- Effective styling integrates the mural with furnishings, lighting, and accessories, ensuring it complements the overall design scheme rather than overpowering it.
- Proper care, typically involving gentle cleaning and avoiding abrasive chemicals, is essential for maintaining the longevity and vibrancy of a wall mural.
What Exactly is a Wall Mural?
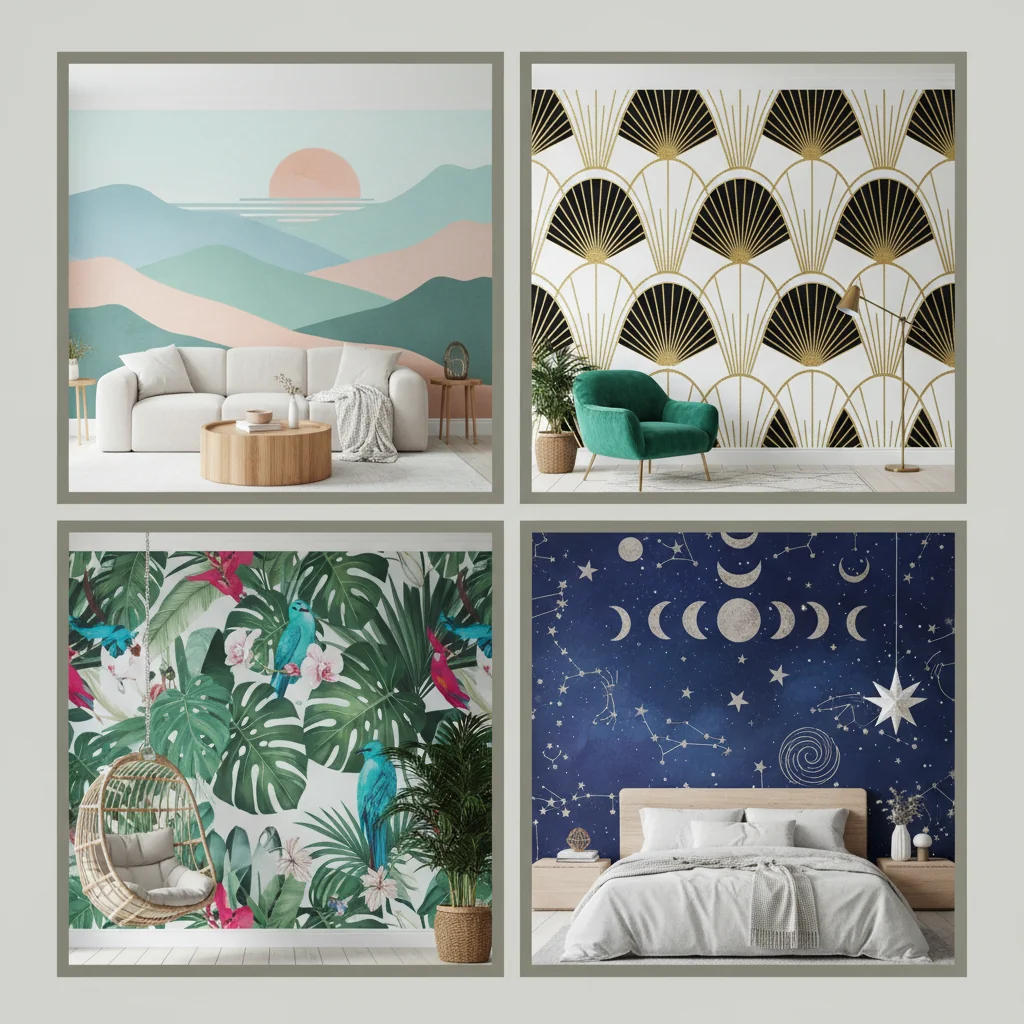
A wall mural is an expansive, single-image artwork or design applied directly to a wall, designed to create a continuous, immersive visual experience rather than a repeating pattern. Unlike traditional wallpaper, which typically features a small, repeating motif across a roll, a mural presents a large-scale, often custom-sized image that covers an entire wall or a significant portion of it, serving as a singular focal point. This distinction allows for dramatic artistic statements, from photo-realistic landscapes to intricate abstract compositions, transforming the perception of a room’s scale and atmosphere.
Historically, murals have adorned significant architectural spaces for millennia, from the ancient frescoes of Pompeii to the grand narratives of Renaissance churches. Modern wall murals, however, leverage advanced digital printing technology, allowing for virtually any image to be reproduced with exceptional clarity and color fidelity on a variety of durable, easy-to-install materials. These contemporary applications make high-impact design accessible for residential and commercial interiors, offering a versatile solution for personalizing and enhancing any space. They are specifically engineered for ease of installation and durability, often featuring washable surfaces and UV-resistant inks that prevent fading over time.
The primary purpose of a wall mural is to introduce a distinct visual narrative or mood into a room. It can expand a small space with an open landscape, add depth with a geometric pattern, or infuse personality with a custom illustration. Wall murals are typically printed in panels that are carefully aligned during installation to form the complete image seamlessly. This method ensures that even very large designs can be applied smoothly and precisely, creating the illusion of a hand-painted artwork or a window to another world. The flexibility in design and application makes murals a powerful tool in interior design, capable of defining a room’s character with a single, bold statement.
**Wall murals** are defined as large-format, non-repeating images or artistic designs applied to a wall surface to create a singular, immersive visual experience. This sets them apart from wallpapers, which are characterized by their repetitive patterns. The advancement in printing technology has made custom and photographic murals highly accessible, allowing for high-resolution imagery and intricate designs that were once only achievable through hand-painting.
The installation process for modern murals has also evolved, offering options such as peel-and-stick, which simplifies application for the homeowner, and paste-the-wall materials, preferred by professionals for their robust finish. These innovations have broadened the appeal of murals, making them a practical and impactful choice for anyone looking to make a significant design statement without the permanence or cost associated with traditional fine art installations. From residential living rooms to commercial lobbies, murals provide a dynamic way to reflect personal style, brand identity, or a desired emotional atmosphere.
Exploring the Diverse Types of Wall Murals
Wall murals come in an extensive array of types, each offering a unique aesthetic and functional benefit, allowing designers and homeowners to precisely match their vision with the perfect visual solution. These types are primarily categorized by their imagery, artistic style, and the material they are printed upon, influencing both their appearance and application. Understanding these distinctions is crucial for selecting a mural that not only looks stunning but also performs optimally within its intended environment.
Photographic Wall Murals
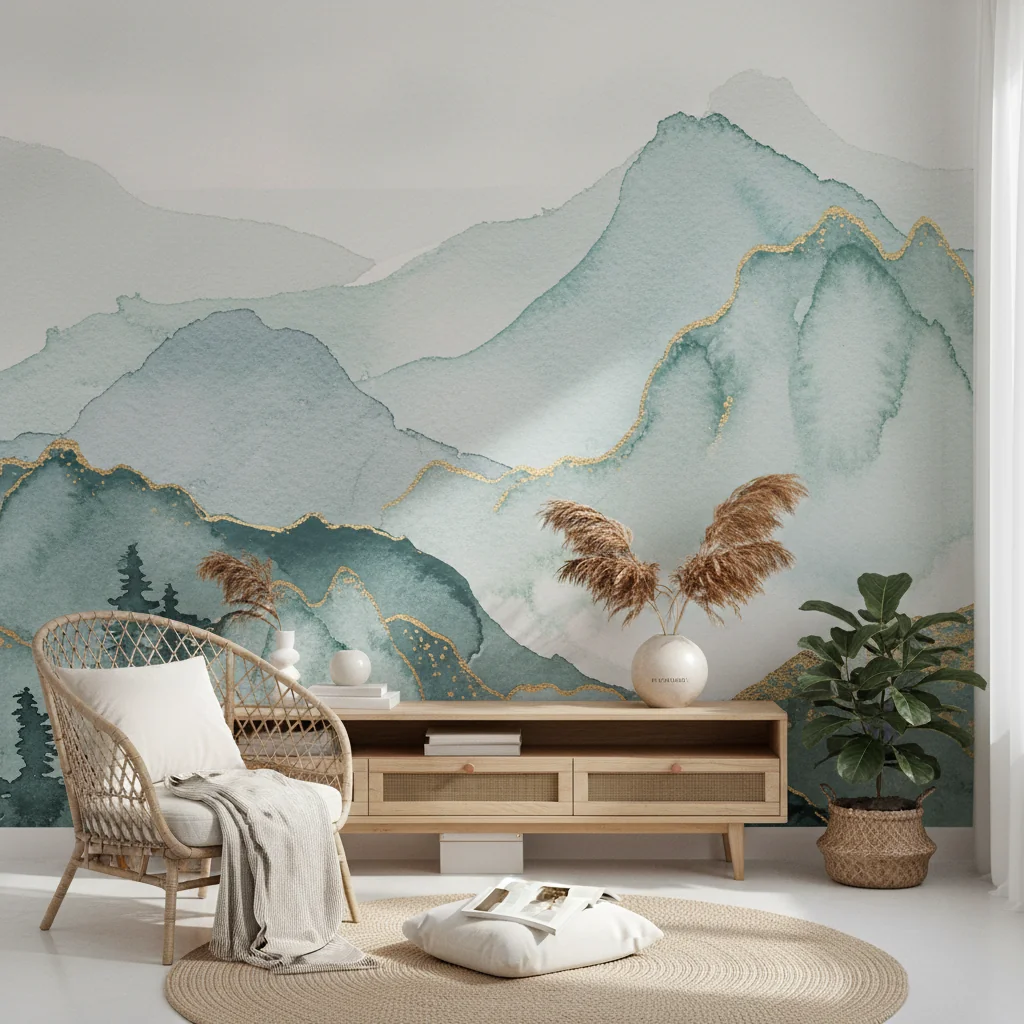
Photographic wall murals reproduce high-resolution images, offering a realistic and immersive visual experience. These can range from breathtaking natural landscapes—such as serene forests, majestic mountains, or tranquil ocean scenes—to bustling cityscapes, abstract macro photography, or even personalized family portraits. The power of photographic murals lies in their ability to transport the viewer, creating an illusion of depth and expanding the perceived space of a room. They are particularly effective in areas where a strong connection to nature or a specific location is desired, such as a home office overlooking a virtual beach or a child’s bedroom featuring a cosmic nebula.
Illustrative and Artistic Wall Murals
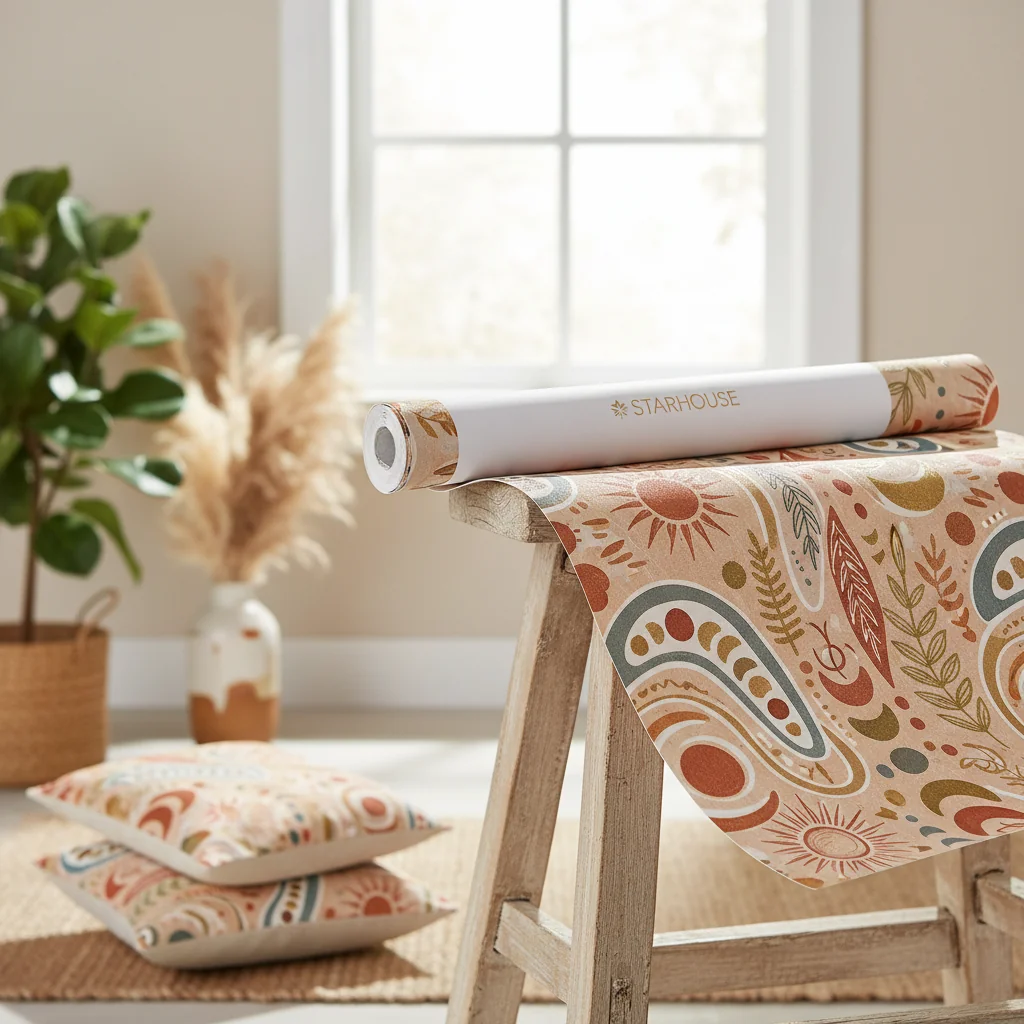
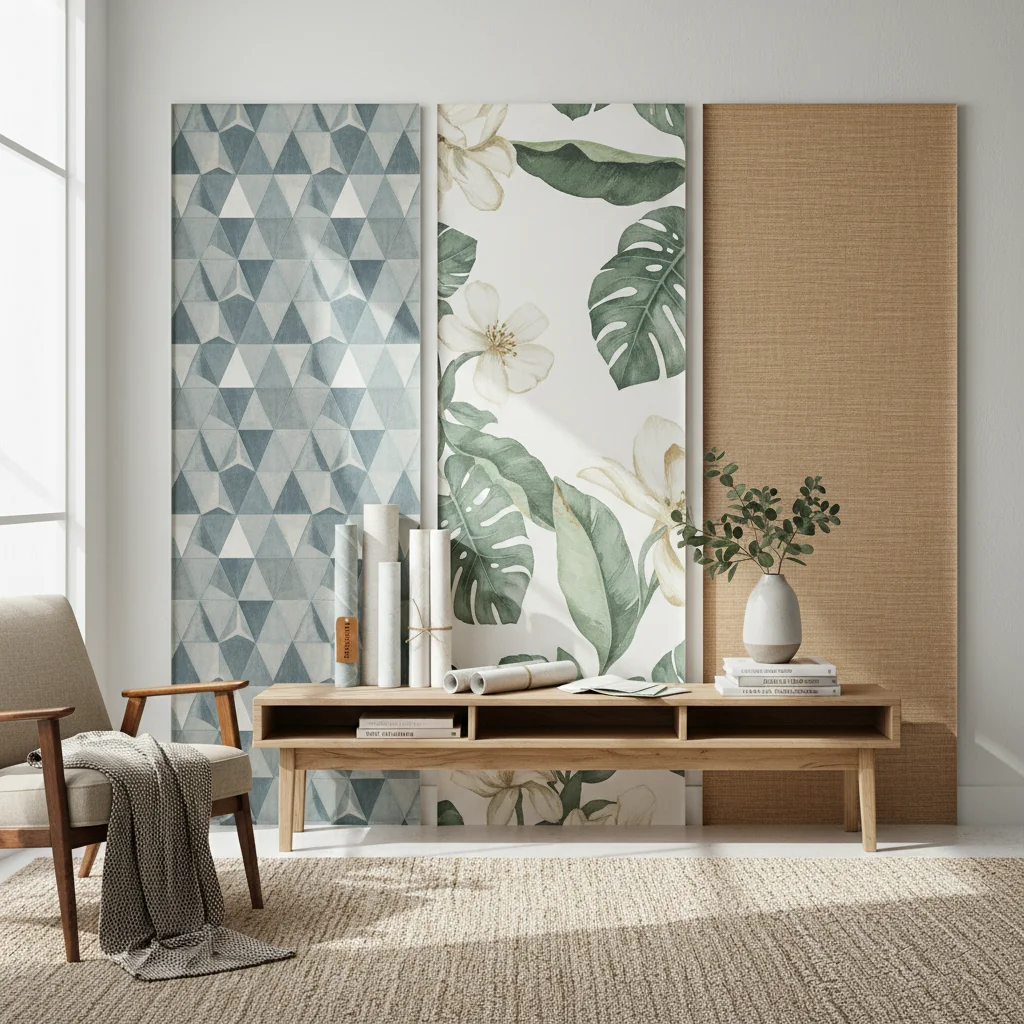
Illustrative murals feature hand-drawn, painted, or digitally created artwork, providing a more stylized and expressive aesthetic. This category includes a vast spectrum of artistic styles, from intricate botanical drawings and whimsical cartoon designs for children’s rooms to sophisticated abstract compositions and graphic art. Illustrative murals often convey a narrative or a specific mood through their artistic interpretation, making them ideal for adding character and a unique artistic touch that cannot be achieved with photography. They allow for greater creative freedom in color palettes and stylistic choices, ensuring a truly personalized design statement.
Abstract Wall Murals
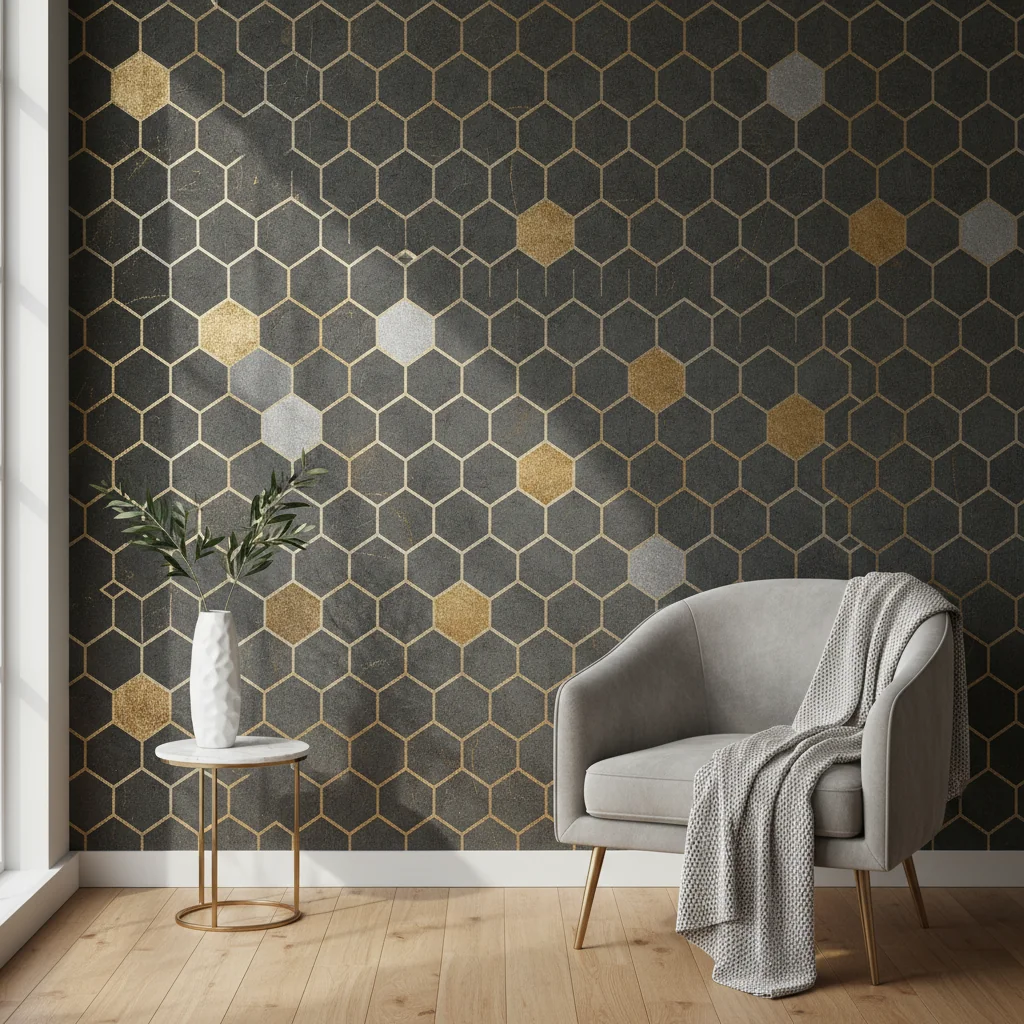
Abstract wall murals focus on forms, colors, and textures rather than representational imagery, offering a contemporary and often sophisticated design element. These murals can feature geometric patterns, fluid brushstrokes, color gradients, or textural illusions. Their appeal lies in their versatility; abstract designs can complement a minimalist interior, add a pop of color to a neutral room, or create a dynamic focal point without depicting a specific subject. They are excellent for creating a modern, artistic ambiance and can be particularly effective in spaces that benefit from visual interest without overwhelming the existing decor.
Trompe L’oeil Murals
Trompe l’oeil, a French term meaning “deceive the eye,” refers to murals designed to create an optical illusion of depth and three-dimensionality. These murals often depict architectural elements like arches, windows, or intricate moldings, or scenes that appear to extend beyond the physical wall. A trompe l’oeil mural can dramatically alter the perception of space, making a small room feel larger or adding a surprising element of visual intrigue. They require careful consideration of perspective and lighting to achieve their full effect, often becoming a captivating conversation piece in a home.
Custom and Personalized Murals
Custom wall murals offer the ultimate in personalization, allowing homeowners to use their own images, artwork, or specific design concepts. This could involve blowing up a favorite photograph, commissioning an artist to create a unique design, or adapting a pattern to perfectly fit unique architectural features. Custom murals ensure that the design is entirely unique to the space and reflects the occupant’s individual taste and story. Starhouse recognizes the desire for unique expression and the power of personalization in home decor, allowing for bespoke design solutions that truly resonate with our clients.
Textured and Embossed Murals
While primarily a material characteristic, some murals are designed with a textured finish or embossed patterns that add a tactile dimension to the visual design. These can mimic the appearance and feel of linen, concrete, wood grain, or other natural surfaces, adding depth and sophistication. Textured murals are particularly effective in creating a sense of warmth, luxury, or rustic charm, depending on the chosen texture, and they can help to absorb sound, contributing to a more comfortable acoustic environment.
Choosing the Right Wall Mural Style for Your Space
Selecting the ideal wall mural style requires careful consideration of your home’s existing aesthetic, the room’s function, and the desired atmosphere you wish to cultivate, ensuring a cohesive and impactful design statement. A mural is a significant visual element, and its style must harmonize with the architectural features, furniture, and overall design language of the space it inhabits. A well-chosen mural enhances the room’s character, while a mismatched one can create visual dissonance.
Assessing Your Existing Decor and Architecture
Before diving into mural styles, take stock of your current decor. Is your home predominantly modern, traditional, minimalist, or eclectic? The mural should ideally complement this existing foundation. For instance, a highly ornate, traditional floral mural might clash with sleek, mid-century modern furnishings. Consider the architectural style of your home as well; a Victorian home might lend itself to classical landscapes or intricate botanical designs, while a contemporary loft could embrace abstract geometrics or industrial-themed photographic murals.
Understanding Room Function and Mood
The purpose of the room heavily influences the most appropriate mural style.
- **Living Rooms:** Often social hubs, living rooms can benefit from grand, conversation-starting murals. Consider panoramic landscapes, sophisticated abstracts, or large-scale artistic prints that reflect your personality and entertain guests.
- **Bedrooms:** These are sanctuaries for relaxation. Opt for calming scenes like tranquil forests, soft cloudscapes, or subtle abstract patterns in soothing color palettes. Avoid overly stimulating or complex designs that might disrupt rest.
- **Dining Rooms:** Murals here can set a refined or celebratory tone. Botanical illustrations, vineyard scenes, or elegant geometric patterns can create a sophisticated backdrop for meals and gatherings.
- **Home Offices:** To inspire focus or creativity, consider murals depicting inspiring natural vistas, world maps, or abstract art that stimulates thought without being distracting.
- **Children’s Rooms:** Vibrant and playful designs are often best. Think whimsical illustrations, fantastical maps, space scenes, or favorite animal motifs that spark imagination and joy.
The mood you wish to evoke is paramount. Do you want a lively, energetic space or a serene, calming retreat? The mural’s colors, subject matter, and style will dictate this emotional response.
Exploring Key Design Styles and Their Mural Matches
Different interior design styles naturally align with specific mural aesthetics:
| Interior Design Style | Recommended Mural Styles | Key Characteristics |
|---|---|---|
| **Modern/Contemporary** | Abstract geometrics, minimalist landscapes, large-scale graphic patterns, monochromatic cityscapes. | Clean lines, open spaces, functional design, often neutral palettes with bold accents. |
| **Traditional/Classic** | Classical landscapes, botanical prints, Chinoiserie, ornate historical scenes, frescoes. | Rich textures, antique furnishings, symmetrical layouts, detailed craftsmanship, formal ambiance. |
| **Minimalist** | Subtle textures, soft gradients, abstract forms with limited color, monochromatic patterns. | Understated elegance, uncluttered spaces, emphasis on functionality and simplicity. |
| **Bohemian/Eclectic** | Vibrant global patterns, lush jungle scenes, intricate mandalas, travel-inspired photography. | Layered textures, diverse cultural influences, relaxed and unconventional aesthetic. |
| **Industrial** | Exposed brick, concrete textures, urban landscapes, vintage blueprints, metallic abstracts. | Raw materials, utilitarian design, exposed structural elements, often monochromatic. |
| **Rustic/Farmhouse** | Forests, pastoral scenes, distressed wood textures, vintage botanical illustrations, barn doors. | Natural materials, reclaimed wood, cozy and inviting atmosphere, emphasis on comfort. |
| **Transitional** | Subtle abstract art, muted landscapes, elegant floral patterns that bridge classic and modern. | A blend of traditional and contemporary elements, sophisticated and timeless appeal. |
Color Palette and Scale Considerations
The color palette of your mural should either complement or thoughtfully contrast with your room’s existing colors. A mural can introduce a new accent color or deepen an existing scheme. Consider the scale of the mural in relation to the room size. A large, intricate mural in a small room might feel overwhelming, whereas a too-small mural on a vast wall might look lost. The goal is balance and visual harmony. Starhouse advises considering a mural that subtly extends the room’s existing color story or introduces a carefully chosen accent hue that ties into other elements, such as throw pillows or artwork.
Materials Matter: A Deep Dive into Wall Mural Substrates
The material chosen for a wall mural significantly impacts its appearance, durability, ease of installation, and long-term maintenance, making substrate selection a critical decision in the design process. Different materials offer distinct textures, finishes, and performance characteristics, which must be aligned with the specific requirements of the space and the desired aesthetic outcome. Understanding these material properties ensures both visual satisfaction and practical longevity.
Peel-and-Stick Vinyl (Self-Adhesive)
Peel-and-stick vinyl murals are crafted from a durable vinyl film backed with a pressure-sensitive adhesive, protected by a removable liner. This material is celebrated for its exceptional ease of installation, making it a popular choice for DIY enthusiasts and renters. The adhesive allows for repositioning during application, minimizing errors, and the material can often be removed cleanly without damaging the underlying wall surface upon removal.
- **Pros:** Extremely easy to install (no paste required), repositionable, generally washable, excellent for temporary installations or rental properties.
- **Cons:** May not adhere perfectly to highly textured walls; some lower-quality versions can stretch during application or have less robust adhesion over time.
- **Ideal Use:** Bedrooms, children’s rooms, temporary decor, accent walls, spaces requiring frequent updates.
Traditional Vinyl (Paste-the-Wall or Paste-the-Paper)
Traditional vinyl murals feature a printed vinyl layer on a paper or non-woven backing, requiring a separate adhesive (paste) for installation. These materials are generally thicker and more robust than peel-and-stick options, offering enhanced durability and a more professional finish. They are often highly washable and resistant to moisture, making them suitable for high-traffic areas.
- **Pros:** Highly durable, excellent print quality, very washable, long-lasting, suitable for high-humidity areas (depending on specific type).
- **Cons:** Requires adhesive and more involved installation; removal can be more challenging than peel-and-stick.
- **Ideal Use:** Bathrooms, kitchens, commercial spaces, high-traffic areas, permanent installations.
Non-Woven Fabric
Non-woven fabric murals are made from a blend of natural and synthetic fibers, offering a soft, textile-like texture and exceptional breathability. This material is known for its “paste-the-wall” application, where adhesive is applied directly to the wall, making installation cleaner and often easier than traditional paste-the-paper methods. Non-woven murals are dimensionally stable, meaning they resist shrinking or expanding when wet, which helps prevent seams from opening.
- **Pros:** Breathable (resists mold and mildew), durable, easy “paste-the-wall” application, often strippable for clean removal, soft matte finish.
- **Cons:** Can be more expensive than vinyl; some delicate patterns might require careful handling during installation.
- **Ideal Use:** Living rooms, bedrooms, dining rooms, nurseries, spaces where breathability and a premium feel are desired.
Canvas-Textured Materials
Some murals are printed on vinyl or non-woven materials that have been embossed or textured to mimic the look and feel of artist’s canvas. This adds a sophisticated, artistic dimension to the mural, providing depth and a tactile quality that enhances the visual imagery. Canvas-textured murals are particularly effective for reproducing fine art, painted scenes, or abstract designs, giving them a gallery-like presentation.
- **Pros:** Adds luxurious texture and depth, enhances artistic designs, durable and often washable.
- **Cons:** Can be more expensive; texture might slightly alter the appearance of very fine details in some images.
- **Ideal Use:** High-end residential spaces, art-focused interiors, feature walls where a gallery aesthetic is desired.
Material Comparison Overview
| Material Type | Application Method | Durability & Washability | Texture/Finish | Ideal Use Cases |
|---|---|---|---|---|
| **Peel-and-Stick Vinyl** | Self-adhesive (peel & stick) | Medium; generally washable | Smooth matte or satin | Rentals, DIY, temporary decor, low-traffic areas |
| **Traditional Vinyl** | Paste-the-wall/paper | High; highly washable & scrubbable | Smooth, subtle texture, or embossed | Bathrooms, kitchens, high-traffic, commercial |
| **Non-Woven Fabric** | Paste-the-wall | High; washable, breathable | Soft, matte, textile-like | Bedrooms, living rooms, nurseries, premium residential |
| **Canvas-Textured** | Paste-the-wall/paper (varies) | High; washable (depends on base) | Embossed canvas texture | Artistic features, sophisticated interiors |
When selecting a material, consider the environment of the room. High-humidity areas like bathrooms or kitchens benefit from moisture-resistant vinyl. High-traffic zones like hallways or commercial spaces require robust, highly washable materials. For bedrooms or nurseries, breathable non-woven fabrics are often preferred. Starhouse emphasizes that understanding these material nuances ensures your mural not only looks exquisite but also stands the test of time in its intended setting.
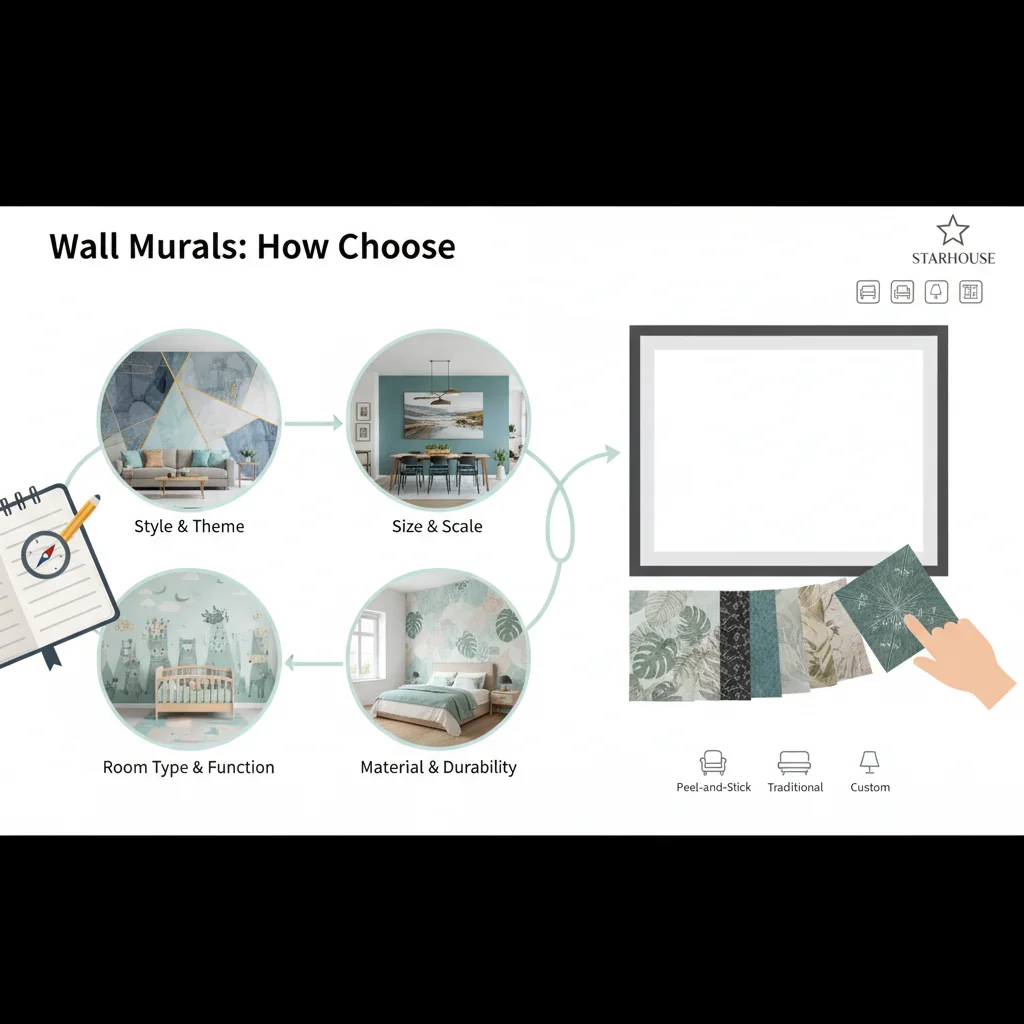
Precision in Planning: Sizing and Measuring for Your Wall Mural
Accurate sizing and meticulous measurement are the most critical steps in the wall mural selection and installation process, directly impacting the final aesthetic and preventing costly errors. A mural that is sized incorrectly will either fall short of the desired visual impact or present significant challenges during installation, compromising the seamless flow of the design. Precise measurements ensure that the mural fits perfectly, accounting for all architectural features and achieving a professional, integrated look.
Step 1: Gather Your Tools
Before you begin, ensure you have the right tools for accurate measurement:
- A sturdy metal tape measure (at least 25 feet long)
- A pencil and notepad
- A level or laser level
- A step stool or ladder, if necessary
- A helper, especially for wider walls
Step 2: Measure the Wall’s Full Width and Height
Begin by measuring the total width and height of the wall where the mural will be installed.
- **Measure Width:** Measure the wall’s width at three different points: the top, middle, and bottom. This accounts for any slight variations or non-parallel walls. Record the widest measurement.
- **Measure Height:** Measure the wall’s height at three different points: the left, middle, and right. Again, record the tallest measurement.
Always round up to the nearest inch. For example, if your measurement is 144.5 inches, record it as 145 inches. This ensures you have enough material to cover the entire area without coming up short.
Step 3: Account for Architectural Features
Identify and measure any permanent fixtures on the wall that the mural will need to accommodate:
- **Doors and Windows:** Measure the exact width and height of these openings.
- **Electrical Outlets and Switches:** Note their positions relative to the floor and adjacent walls.
- **Built-in Shelves or Cabinetry:** Measure their dimensions and placement.
While these features will be cut out during installation, knowing their exact location helps visualize how the mural’s design will be affected and ensures no critical elements of the image are obscured or awkwardly placed.
Step 4: Add a Bleed or Buffer (Crucial for Custom Murals)
For custom-sized murals, it is highly recommended to add a “bleed” or buffer to your final dimensions. A bleed is an extra margin of print that extends beyond the trim edge of the finished product, typically 2-4 inches on each side (top, bottom, left, right).
- **Why it’s essential:** Walls are rarely perfectly square or plumb. Adding a bleed ensures that you have enough material to trim precisely to the wall’s actual edges, even if they are slightly uneven, providing a perfect, seamless fit. Without a bleed, you risk having small gaps or an incomplete design if your wall is slightly larger than anticipated or if your cutting isn’t perfectly straight.
- **Example:** If your wall measures 120 inches wide by 96 inches high, order a mural that is 124 inches wide by 100 inches high (adding 4 inches to both width and height for a 2-inch bleed on each side). The excess material is trimmed away after installation.
Step 5: Consider the Design’s Orientation and Scale
Once you have your precise measurements, visualize how the chosen mural design will appear on that specific wall.
- **Orientation:** Ensure the image’s orientation (portrait or landscape) aligns with your wall’s dimensions.
- **Key Elements:** If the mural has prominent features (e.g., a specific tree, a building, a character), consider where these elements will fall relative to furniture, windows, or doors. You want to avoid having a crucial part of the design cut off or hidden.
- **Scale:** A large-scale design might be overwhelming in a small space, while a delicate pattern could get lost on a vast wall. Most mural providers offer tools to preview the design on your specific wall dimensions.
Step 6: Double-Check Everything
Before placing your order, re-measure all dimensions at least twice. Have a second person verify your measurements if possible. This small step can prevent significant disappointment and additional costs. Starhouse emphasizes that meticulous planning at this stage is the cornerstone of a flawless mural installation and a stunning final result.
Application Techniques: From DIY to Professional Installation
The successful installation of a wall mural hinges on selecting the appropriate application technique and meticulously preparing the wall surface, ensuring a smooth, durable, and visually seamless finish. While some modern murals are designed for relatively straightforward DIY installation, others benefit significantly from the precision and expertise of a professional installer. Understanding the different methods empowers homeowners to make informed decisions for their specific project.
Surface Preparation: The Foundation of Success
Regardless of the mural type, proper wall preparation is non-negotiable.
- **Clean the Wall:** Remove all dirt, dust, and grime. Use a mild detergent solution, rinse thoroughly, and allow the wall to dry completely (at least 24 hours).
- **Repair Imperfections:** Fill any holes, cracks, or dents with spackle, sand smooth, and prime. Even small imperfections can show through the mural material.
- **Smooth Surface:** Ensure the wall is as smooth as possible. Lightly sand any uneven areas. For highly textured walls (e.g., heavily textured drywall), it may be necessary to skim coat and sand to achieve a smooth surface, especially for peel-and-stick murals which require optimal adhesion.
- **Prime the Wall:** Apply a high-quality primer, preferably one designed for wallpaper or murals. Primer creates a uniform surface, enhances adhesion, and helps with easier removal in the future. Allow sufficient drying time as per manufacturer instructions. For dark walls, a white primer is essential to prevent the underlying color from showing through lighter areas of the mural.
Peel-and-Stick (Self-Adhesive) Murals: The DIY-Friendly Option
Peel-and-stick murals are designed for straightforward DIY application, making them popular for temporary installations or those new to wall decor projects.
- **Layout and Alignment:** Lay out all mural panels on a clean floor to ensure the design matches and to identify the correct hanging order. Mark a plumb line on the wall using a level to guide the first panel, ensuring it is perfectly vertical.
- **Application:** Starting from the top, slowly peel back a few inches of the backing paper from the first panel. Align the panel with your plumb line and the ceiling/wall edge. Smooth the mural onto the wall using a plastic smoothing tool (squeegee), working from the center outwards to push out air bubbles. Gradually peel off more of the backing paper while continuing to smooth the mural downwards.
- **Overlap and Trim:** Most peel-and-stick murals are designed with a slight overlap (typically 0.5-1 inch) between panels. Align the second panel by overlapping it precisely with the first, ensuring the design matches perfectly. Once all panels are applied, use a sharp utility knife and a straight edge to trim any excess material at the ceiling, baseboards, and corners.
**Tip:** Have a helper for wider panels to prevent the material from sticking to itself or the wall prematurely.
Paste-the-Wall Murals: Clean and Efficient
This method involves applying adhesive directly to the wall rather than to the mural panels, making it a cleaner and often faster process than traditional paste-the-paper. Non-woven fabric murals commonly use this technique.
- **Prepare Adhesive:** Mix the recommended wallpaper paste according to the manufacturer’s instructions.
- **Apply Paste to Wall:** Use a roller to apply an even coat of paste to the section of the wall where the first panel will go, extending slightly beyond its width. Do not over-paste.
- **Hang Panel:** Take the dry mural panel and align it with your plumb line and ceiling/wall edge. Press it firmly into the pasted area. Use a smoothing brush or squeegee to remove air bubbles, working from the center to the edges.
- **Seaming:** For subsequent panels, apply paste to the next section of the wall. Butt the edge of the new panel directly against the edge of the previous one (no overlap for most paste-the-wall materials), ensuring the design aligns perfectly. Use a seam roller to gently press down the seams for a smooth finish.
- **Trim and Clean:** Trim excess material at the top and bottom with a sharp utility knife. Carefully wipe away any excess paste from the mural surface and seams with a clean, damp sponge.
Paste-the-Paper Murals: Traditional Method
This technique, common for traditional vinyl or paper-backed murals, involves applying paste directly to the back of the mural panel.
- **Prepare Paste:** Mix the adhesive.
- **Paste the Panel:** Lay the mural panel face down on a clean, protected surface. Apply an even coat of paste to the back of the panel, ensuring full coverage to the edges.
- **Book the Panel:** Gently fold the pasted panel in on itself, paste-to-paste, without creasing. This allows the paste to soak into the material, making it more pliable and preventing bubbling. Follow the manufacturer’s recommended “booking” time, typically 5-10 minutes.
- **Hang Panel:** Unfold the top portion of the booked panel and align it with your plumb line and ceiling/wall edge. Smooth it onto the wall. Unfold the bottom portion and continue smoothing.
- **Seaming, Trimming, and Cleaning:** Proceed as with paste-the-wall murals, aligning seams (often with a slight overlap to be double-cut later for a perfect butt joint), trimming excess, and wiping away paste.
When to Consider Professional Installation
While DIY is feasible for many peel-and-stick options, professional installation is highly recommended for:
- **Large or Complex Murals:** Very wide or tall murals, or those with intricate patterns that require precise alignment.
- **Challenging Surfaces:** Highly textured walls, walls with many architectural obstacles, or irregularly shaped rooms.
- **High-Value Materials:** To protect your investment and ensure a flawless finish.
- **Time Constraints:** Professionals work efficiently and can complete the job much faster.
A skilled installer possesses the experience and specialized tools to handle potential issues, ensuring a bubble-free, perfectly aligned, and long-lasting mural. Starhouse advises that for optimal results and peace of mind, particularly with significant design investments, professional installation is often the superior choice.
Current Trends in Wall Mural Design
Wall mural design is a dynamic field, constantly evolving to reflect contemporary aesthetics, technological advancements, and shifting preferences in home decor, offering fresh and impactful ways to personalize interiors. Staying abreast of current trends allows homeowners and designers to create spaces that feel current, sophisticated, and deeply reflective of modern sensibilities. These trends often blend artistic expression with functional benefits, pushing the boundaries of what wall decor can achieve.
Biophilic Design and Nature-Inspired Murals
The desire to connect with nature indoors continues to drive the popularity of biophilic design, and wall murals are at its forefront. This trend features lush botanical prints, expansive forest scenes, tranquil mountain vistas, and serene ocean views. The emphasis is on bringing the calming and rejuvenating qualities of the natural world into living spaces, promoting well-being and reducing stress. Expect to see more abstract interpretations of nature, such as blurred landscapes or macro shots of foliage, alongside realistic depictions.
Abstract Art and Expressive Forms
Abstract murals are gaining significant traction, moving beyond simple geometric patterns to embrace more fluid, expressive, and painterly forms. This trend includes large-scale brushstroke designs, color-field murals with soft gradients, and abstract compositions that evoke emotion or intellectual curiosity without depicting a specific subject. These murals often use sophisticated color palettes and can serve as modern art installations, adding a gallery-like feel to contemporary interiors.
Textural Illusions and Tactile Surfaces
Advancements in printing technology allow murals to replicate the look and feel of various textures, adding a tactile dimension to walls. Trends include murals that mimic concrete, distressed plaster, exposed brick, raw wood, natural stone, or even woven fabrics. These textural illusions add depth, warmth, and an industrial-chic or rustic elegance without the weight or cost of actual materials. They are particularly effective in creating a sophisticated backdrop that grounds a room’s design.
Large-Scale Art and Oversized Graphics
The trend towards grand, impactful statements means murals are increasingly being used as oversized art pieces. This involves single, dramatic images that span an entire wall, such as a monumental portrait, an expansive abstract painting, or a magnified botanical illustration. The scale creates an immediate focal point and imparts a sense of luxury and artistic intention, transforming a wall from a mere boundary into a canvas for a singular artistic vision.
Muted Tones and Earthy Palettes
While bold colors always have their place, current trends lean heavily towards softer, more muted color palettes inspired by natural elements. Think terracotta, sage green, dusty blues, warm grays, and sandy beiges. These earthy tones create a serene and sophisticated atmosphere, making a space feel grounded and calming. Murals in these palettes often feature subtle patterns or gentle gradients, providing visual interest without overwhelming the senses.
Vintage Revival and Art Deco Influences
Nostalgia continues to inspire design, with a resurgence of vintage-inspired murals. This includes Art Deco geometrics with metallic accents, Chinoiserie patterns, classic toile designs, and historical maps. These murals add character, a sense of history, and a touch of timeless elegance. They are often reinterpreted with modern color schemes or simplified forms to fit contemporary interiors, blending old-world charm with current sensibilities.
Geometric Patterns with a Twist
Geometric murals remain popular, but the trend is moving towards more complex, layered, or deconstructed patterns. Instead of simple squares, we see intricate tessellations, three-dimensional illusions, and abstract arrangements of shapes that play with perspective and depth. These designs often incorporate metallic elements or contrasting textures to add sophistication and visual intrigue, creating dynamic feature walls.
Starhouse curates collections that reflect these evolving trends, ensuring our customers have access to the most current and sophisticated designs. Whether you seek the tranquility of nature, the boldness of abstract art, or the timeless charm of vintage patterns, a mural exists to perfectly capture your vision and elevate your space.
Mastering the Art of Styling and Pairing Wall Murals
Successfully integrating a wall mural into your home decor requires thoughtful styling and strategic pairing with existing elements, transforming the mural from a mere wall covering into a cohesive and impactful design statement. A mural, by its very nature, demands attention, and its surrounding environment must be carefully orchestrated to complement its presence without competing for visual dominance. The goal is to create a harmonious space where the mural feels like an organic extension of the room’s design narrative.
Treat the Mural as a Piece of Art
Consider your wall mural not just as wallpaper, but as a large-scale artwork. This perspective guides your styling choices. Just as you wouldn’t clutter the space around a prized painting, allow your mural room to breathe.
- **Focal Point:** Often, the mural itself becomes the room’s primary focal point. Arrange furniture to face or highlight the mural, creating a natural flow of attention.
- **Minimalist Approach:** In many cases, less is more. Avoid hanging additional artwork directly on top of or immediately adjacent to the mural, especially if it’s a detailed or photographic design. Let the mural speak for itself.
Furniture Placement and Scale
The furniture in front of a mural should complement its scale and theme without obscuring too much of the design.
- **Low-Profile Pieces:** Opt for furniture that doesn’t block the mural’s key elements. A low-slung sofa, a console table, or open-shelving units can work well.
- **Color Coordination:** Choose furniture colors that either match a subtle hue within the mural or provide a complementary contrast. Avoid clashing colors that create visual discord.
- **Texture Play:** If your mural has a smooth finish, introduce textured furniture (e.g., a boucle sofa, a rattan chair) to add tactile interest to the room. Conversely, a textured mural might pair well with smoother, more streamlined furniture.
Lighting to Enhance and Define
Lighting plays a pivotal role in showcasing your mural, influencing its perceived depth, color, and texture.
- **Accent Lighting:** Wall-mounted picture lights or recessed spotlights can illuminate the mural, drawing attention to its details and making it pop.
- **Ambient Light:** Ensure the room has sufficient ambient lighting to prevent the mural from looking dim or flat. Natural light is ideal, but well-placed lamps can compensate.
- **Avoid Glare:** Position light sources to minimize glare on the mural’s surface, especially if it has a slight sheen. Matte finishes are generally less prone to glare.
Accessories: The Finishing Touches
Accessories should echo the mural’s theme, color palette, or mood, tying the entire room together.
- **Pillows and Throws:** Select textiles that pull colors directly from the mural or introduce complementary shades. For a botanical mural, use pillows with leaf patterns or solid greens.
- **Vases and Decor Objects:** Choose decorative items that align with the mural’s style. A minimalist abstract mural might pair with sleek ceramic vases, while a rustic landscape could be complemented by natural wood elements.
- **Plants:** For nature-themed murals, incorporate real plants to enhance the biophilic connection. The lushness of living greenery can beautifully extend a printed forest or jungle scene.
- **Mirrors:** A strategically placed mirror on an adjacent wall can reflect portions of the mural, extending its visual impact and making the room feel larger.
Color Harmony and Contrast
The colors within your mural should inform the entire room’s color scheme.
- **Harmonious Palette:** Select 2-3 dominant colors from the mural and repeat them in smaller doses throughout the room via textiles, art, or accessories.
- **Strategic Contrast:** Use a contrasting color sparingly to create visual interest and prevent the room from feeling monotonous. For example, a mural with cool blues and greens could be accented with a warm terracotta vase.
- **Neutral Balance:** If your mural is very vibrant or busy, balance it with neutral walls, flooring, and larger furniture pieces in the rest of the room. This allows the mural to be the star without overwhelming the space.
By approaching mural integration with a designer’s eye, considering scale, color, light, and complementary elements, you can transform any room into a curated masterpiece. Starhouse believes that a well-styled mural not only decorates a wall but defines the soul of a space.
Maintaining Your Wall Mural: Care and Longevity
Proper care and regular maintenance are essential for preserving the vibrancy, integrity, and longevity of your wall mural, protecting your investment and ensuring it continues to enhance your space for years to come. The specific cleaning and protection methods depend largely on the mural’s material, as different substrates exhibit varying levels of durability and resistance to moisture and abrasives. Adhering to manufacturer guidelines is paramount to avoid damage.
General Care Principles
Regardless of the material, some universal care practices apply to all wall murals:
- **Dust Regularly:** Use a soft, dry microfiber cloth or a feather duster to gently remove surface dust. This prevents accumulation that can dull the mural’s appearance over time.
- **Avoid Abrasives:** Never use abrasive cleaners, scouring pads, or stiff brushes, as these can scratch, dull, or remove the printed image and protective layers.
- **Test in an Inconspicuous Area:** Before applying any cleaning solution to the main mural, always test it on a small, hidden area (e.g., behind furniture or in a corner that will be covered) to ensure it doesn’t cause discoloration or damage.
- **Address Spills Promptly:** For any liquid spills or splatters, wipe them away immediately with a clean, damp cloth to prevent staining.
Material-Specific Cleaning Instructions
The cleaning regimen for your mural is dictated by its substrate:
-
**Vinyl Murals (Peel-and-Stick & Traditional):** Most vinyl murals are highly durable and washable.
For general cleaning, use a soft cloth dampened with a mild soap and water solution (e.g., a few drops of dish soap in a gallon of water). Gently wipe the surface, then follow with a clean cloth dampened with plain water to rinse off any soap residue. Pat dry with a clean, soft towel. Avoid saturating the material or letting water seep behind the seams. For stubborn marks, a non-abrasive household cleaner (like an all-purpose spray) can be used, but always test first.
-
**Non-Woven Fabric Murals:** These are generally washable but require a gentler approach than vinyl.
Use a soft, damp cloth with a very mild soap solution. Gently blot or wipe the affected area. Avoid rubbing vigorously, which can damage the fibers or print. Rinse lightly with a clean, damp cloth and allow to air dry. Non-woven materials are breathable, which helps prevent mold, but they are not as water-resistant as vinyl.
-
**Paper-Based Murals (Less Common Today):** Traditional paper-based murals are typically less durable and often not washable.
For these, dry dusting is usually the only safe method. For marks, very gently blot with a barely damp cloth, but be aware that water can cause damage or discoloration. Professional cleaning may be required for significant stains.
Protection and Longevity Tips
Beyond cleaning, several measures can extend your mural’s lifespan:
- **Avoid Direct Sunlight:** Prolonged exposure to direct sunlight can cause colors to fade over time, especially with certain ink types. Use UV-blocking window treatments (blinds, curtains, or films) to protect murals in sun-exposed areas.
- **Maintain Consistent Room Conditions:** Extreme fluctuations in temperature and humidity can affect mural adhesion, especially for paste-applied types. Maintain a stable indoor environment.
- **Prevent Physical Damage:** Be mindful of furniture being moved against the wall, pets scratching, or children’s activities that could scuff or tear the mural. Consider clear protective panels in high-impact areas, if appropriate.
- **Manufacturer’s Guidelines:** Always refer to the specific care instructions provided by the mural manufacturer. These instructions are tailored to the exact materials and inks used and provide the most accurate guidance for care. Consumers benefit from clear, accessible information when making purchasing decisions and maintaining products, a principle reflected in general guidance for public information dissemination by federal agencies, as outlined by the Office of Management and Budget (OMB) through resources like guidance on internet information dissemination.
- **Minor Repairs:** For small tears or lifting seams, a small amount of appropriate adhesive (e.g., wallpaper paste for traditional murals, or a suitable craft adhesive for vinyl) can often be used to re-secure the damaged area. Always apply sparingly and wipe away excess immediately.
By following these care instructions, your wall mural from Starhouse will remain a captivating and inspiring element in your home for many years to come, reflecting its original beauty and enhancing your living environment.
Common Mistakes to Avoid When Selecting and Installing a Wall Mural
Even with the most beautiful design, a wall mural’s impact can be diminished or entirely undermined by common oversights during selection and installation. Awareness of these pitfalls is crucial for ensuring a successful outcome, transforming your vision into a flawlessly executed design feature rather than a source of frustration. Avoiding these mistakes guarantees a professional finish and long-lasting satisfaction.
1. Inaccurate Measurements
**Mistake:** Ordering a mural that is too small or too large for the intended wall. This is the single most common and detrimental error. Too small means gaps or an awkward floating effect; too large means excessive trimming and potential design distortion.
**Correction:** Always measure the wall’s width and height at multiple points (top, middle, bottom for width; left, middle, right for height) and use the largest measurements. Add a 2-4 inch bleed (extra margin) to both height and width for custom orders to account for imperfect walls and ensure a perfect trim. Double-check all measurements before ordering.
2. Neglecting Wall Preparation
**Mistake:** Installing a mural on a dirty, uneven, or improperly primed wall. Dust, grease, holes, or highly textured surfaces will prevent proper adhesion, leading to bubbles, peeling, or visible imperfections through the mural.
**Correction:** Thoroughly clean the wall, fill and sand all imperfections, and apply a high-quality primer. For textured walls, a skim coat may be necessary to achieve a smooth surface, especially for peel-and-stick murals. Allow primer to dry completely.
3. Choosing the Wrong Material for the Environment
**Mistake:** Selecting a mural material unsuitable for the room’s conditions, such as a non-washable paper mural in a high-traffic kitchen or a non-breathable vinyl in a damp basement.
**Correction:** Match the material to the room’s function. Use washable, moisture-resistant vinyl for kitchens and bathrooms. Opt for durable, breathable non-woven fabric for bedrooms and living areas. Consider peel-and-stick for temporary applications or rentals.
4. Ignoring the Room’s Existing Design and Color Palette
**Mistake:** Selecting a mural design or color scheme that clashes with existing furniture, flooring, or overall room aesthetic, creating visual chaos rather than harmony.
**Correction:** View the mural as an integral part of the room’s design. Choose a style and color palette that complements or subtly contrasts with your existing decor. Use online visualizers or samples to see how the mural will look in your space before committing.
5. Poor Panel Alignment or Bubbling During Installation
**Mistake:** Panels are not perfectly aligned, leading to visible seams or misaligned imagery. Bubbles or creases form due to rushing or improper smoothing.
**Correction:** Take your time. Use a plumb line to ensure the first panel is perfectly vertical. Overlap panels correctly (if required) and align the design meticulously. Use a proper smoothing tool (squeegee) and work slowly from the center outwards to push out all air bubbles. For peel-and-stick, repositioning is possible; for paste-based, ensure adequate paste and booking time.
6. Overlooking Lighting Considerations
**Mistake:** Not considering how natural and artificial light will interact with the mural, potentially causing glare, shadows, or fading.
**Correction:** Be aware of windows and light fixtures. Matte finishes generally reduce glare. Protect murals in direct sunlight with UV-blocking window treatments. Plan for accent lighting (e.g., picture lights) to highlight the mural effectively.
7. Not Adding a Bleed to Custom Murals
**Mistake:** Ordering a custom mural with exact wall dimensions, leaving no room for error or wall irregularities.
**Correction:** Always add 2-4 inches of extra material (bleed) to both the height and width of your custom mural order. This ensures you have sufficient material to trim perfectly to your wall’s true edges, even if they are slightly uneven.
8. Rushing the Process
**Mistake:** Attempting to install a mural hastily, leading to errors in measurement, preparation, or application.
**Correction:** Allocate ample time for each stage: measuring, preparing the wall, and installation. Patience and precision are key to a flawless mural. If unsure, consider hiring a professional installer.
By proactively addressing these common mistakes, homeowners can ensure their wall mural project is a resounding success, culminating in a stunning and enduring feature that enhances their living environment. Starhouse emphasizes that careful planning and execution are the hallmarks of sophisticated design.
Sources
Frequently Asked Questions
What is the main difference between a wall mural and wallpaper?
The main difference is that a wall mural features a single, continuous, large-format image or design that covers an entire wall, creating a unified scene, whereas traditional wallpaper consists of repeating patterns that are applied in strips to form a continuous, repetitive motif across the surface.
Can I install a wall mural myself, or do I need a professional?
Many wall murals, particularly peel-and-stick (self-adhesive) types, are designed for DIY installation and can be successfully applied by homeowners with careful attention to instructions. However, for large, complex, or high-value murals, or for challenging wall surfaces, professional installation is recommended to ensure a flawless and long-lasting finish.
How do I clean and maintain my wall mural?
Cleaning and maintenance depend on the mural’s material. Most vinyl murals can be gently wiped with a soft cloth dampened with mild soap and water, followed by a clean water rinse. Non-woven fabric murals require a gentler approach, often just light wiping. Always avoid abrasive cleaners and harsh scrubbing, and refer to the specific manufacturer’s care instructions for optimal longevity.
Are wall murals removable without damaging the wall?
Yes, many modern wall murals, especially peel-and-stick vinyl and some non-woven “paste-the-wall” types, are designed to be removable without damaging properly prepared walls. Peel-and-stick murals typically peel off cleanly, while strippable non-woven murals can often be removed in full sheets. Always check the product specifications for removability claims.
How do I choose the right size for my wall mural?
To choose the right size, measure the wall’s width and height at multiple points (top, middle, bottom for width; left, middle, right for height) and use the largest measurements. For custom murals, always add a 2-4 inch bleed (extra margin) to both height and width to account for wall irregularities and allow for precise trimming during installation, ensuring full coverage.
Can wall murals be used in bathrooms or kitchens?
Yes, wall murals can be used in bathrooms and kitchens, provided you select a material specifically designed for high-humidity and high-traffic environments. Vinyl murals are typically the best choice for these areas due to their moisture resistance and washability. Ensure proper ventilation to prevent excessive moisture buildup.
What types of wall surfaces are suitable for murals?
Wall murals adhere best to smooth, clean, dry, and properly primed surfaces, such as painted drywall or plaster. Highly textured walls (e.g., heavily textured knockdown or popcorn finishes) are generally unsuitable unless they are skim-coated and sanded smooth. Flat or eggshell paint finishes are ideal; glossier paints may require light sanding for optimal adhesion.
Conclusion: Define Your Vision with Starhouse
Wall murals offer an unparalleled opportunity to infuse your living spaces with personality, artistry, and a distinctive sense of style, transforming ordinary walls into captivating narratives. From sprawling natural landscapes that bring the outdoors in, to abstract expressions that ignite the imagination, and historical motifs that evoke timeless elegance, the versatility of modern murals allows for truly bespoke interior design. We have explored the diverse types, essential materials, critical measurement techniques, and nuanced styling considerations that empower you to make informed decisions, ensuring your mural becomes a cherished and enduring feature of your home.
At Starhouse, we understand that your home is a canvas for your life, and every detail contributes to its unique story. Our commitment is to curate a collection of exceptional wall murals and complementary home decor that meets the highest standards of design, quality, and sophistication. We believe that thoughtful design has the power to elevate everyday living, creating environments that inspire, comfort, and delight. As we meticulously build our premier catalog, we are dedicated to offering pieces that resonate with discerning tastes and transform houses into truly aspirational homes.
We invite you to join us on this exciting journey of discovery and design. Share your aspirations, your design dilemmas, and what you envision for your ideal space. Your insights will help shape our curated collection, ensuring we bring you the very best in home decor. Tell us what you’re looking for and get early access to our exclusive collections at starhouseusa.online. Let Starhouse help you define your vision and craft a home that is uniquely, beautifully yours.